The Book About the Body and the Instrument
1. Introduction
Being on stage
To be on stage performing music for an enthusiastic audience can be pleasurable, fantastic, challenging and demanding, but can also often become an uncomfortable and nerve-wracking experience, after which it can be almost impossible to understand how you were able to get from start to finish. Preparation begins much earlier, in the practice room, and it is there that good habits are formed. To feel comfortable, safe and relaxed in the actual performance situation is crucial to then be able to focus on the music itself and give your all when you need.
Ergonomics for Musicians
This document has come into being as reference material to find guidance for the changes needed regarding various injuries. In different educational circumstances, the need is great for reference material with specific information on ergonomics to be used as a basis for the teaching of various instruments. Since making music requires your entire being to be actively engaged, both physically and psychologically, this document also discusses thought patterns and emotions. It includes a review of basic ergonomics as well as ergonomic advice for specific instruments, to be used as a basis for discussion about how to engage the body in a more healthy way in a physiological perspective. We would like to take this opportunity to thank all the professional musicians and educators who have helped us in the development of this work.
We cannot ignore the effect of stress on the body. At times stress can be particularly evident, and it can be difficult to handle the high level of tension in the muscles. A common theme running through these pages is the need to increase knowledge regarding improved self-care. Here you will find advice about various types of preparatory exercises. Physical training is necessary in order to handle an active life as a musician.
3.1 Violin & Viola
3.2 Cello
3.3 Double Bass
3.4 Guitar
3.5 Piano
3.6 Flute
3.7 Recorder
3.8 Clarinet & Oboe
3.9 Trombone
3.10 Trumpet
3.11 French Horn
3.12 Bassoon
3.13 Percussion
3.14 Organ
3.15 Accordeon
3.16 Tuba
2. Basic Ergonomics
The function of the body during the execution of music performance
What is it that holds your instrument up making it possible to perform music?
We begin with a commonplace term – Ergonomics – which encompasses an incredibly broad area, from how we handle our work and its ambient factors mentally, treatment by superiors, area of activity, demands and recovery, to factors of the physical environment, such as light, seating, ventilation, work-surface height, to how we act physically in terms of muscle structure and how we engage and adapt our bodies in various activity-based work positions. To begin with, we will focus on the body and how it can be used in the best way possible in order to facilitate making music. There are many ways to move and also to play an instrument. The goal is to achieve a soft and smooth pattern of movement. To make things manageable and comprehensible, we will look at different parts of the body separately. However, it is important to acknowledge that in reality all parts are connected and one affects the other, and for this reason it is important to see the bigger picture, even if it is initially presented in parts.
Another thing to think about when talking about the body is that we all have different degrees of physical awareness. Some people feel clearly what is happening in the body, aware of the slightest changes, while others have a considerably more basic awareness. This means that it is usually good to seek help from a physiotherapist or another physical therapist to get feedback and guidance about what is happening in the body. Moreover, whenever we try something new or change something that has been habitual for a long time, the body will protest by sending us more information from the altered region, sending signals about increasing tension, pulling, aching or general discomfort. This is completely natural since the body is alive and needs time to adapt its structures to new positions. A problem that often arises is that the person in question feels that it is too uncomfortable, and he or she interprets this as “this can’t be good for me”. Alternatively, the change can demand so much concentration and attention that he or she does not believe it is worth the effort. In general, we can say that after having learned something new, it takes two to three weeks before we can master it, on the condition that we practise it daily. It can take even longer for an action to become automatic.
The body has an amazing ability to adapt itself to what it is subjected to. In respect to our normal sitting and standing positions, we are often “tricked” into thinking that everything feels as normal. However, such awareness does not always mean that this is the best position for the activity we are carrying out at that exact moment. For this reason it is good to occasionally question our normal positions in order to find the optimal position for each given activity. The information and advice below about how our bodies can be adapted to function optimally can at first seem somewhat tedious and time-consuming, but after a while each stage progresses more quickly, developing physical recognition and self-awareness, so that eventually a single thought can be enough for a correction to occur automatically.
Anatomy of the body
We are all constructed on the same concept. We have a skeleton consisting of bones of various sizes and dimensions. The skeleton has joints at strategic points to facilitate movement. For movement to occur, there must be musculature arranged on the skeleton, upon which almost every muscle passes over a joint so movement can occur. The musculature, in turn, is able to function due to the circulatory system that provides it, and every other structure in the body, with energy as well as removing residue and waste. For this to function, breathing is very important. In part, the musculature functions via our large and complex network of nerves. Nerves send out signals to the muscles about what is to happen as well as sending information inwards about what is happening out in the body. These systems collaborate with each other in order for an activity or movement to occur.
The whole of this process is, of course, well known to everyone, to a lesser or greater degree. The question is rather how aware we are about how we use our bodies in different situations and activities, and if we know what is best for us.
Performance often involves an increased strain on certain joints and muscles. At times, playing involves using a joint’s extreme/outer position. If a joint is used in its outer position for a long time, which can, for example, cause the two joint surfaces to “gnaw” at each other, it can cause pain in the joint itself. Pain is also often caused by the overexertion of muscles, muscular attachments or tendons.
In whatever way we choose to arrange the position of our joints, the body can perform movements. However, there are positions where joints, tendons and musculature function optimally and most gently. Each joint in the body has an optimal neutral/medium position with regards to the musculature that is to perform the work, i.e. both to stabilise the respective joint and to perform balanced, smooth movements. Whichever position we adopt, and whichever is most appropriate to use, depends on how long we are to stay in that position and how much power and/or endurance we wish to achieve.
Exercise to examine the significance of the joint position for stress on the muscles.
Try this:
1. Let the arm, forearm and hand/fingers hang freely beside the body and pretend to play your instrument with your fingers.
2. If you now continue to let the arm hang beside the body but angle the hand up as far as possible and then try to play with your fingers again, you will probably feel a difference.
3. Now you can also try to clench your hand and stretch the wrist as far as possible, as if you are gripping something. Now try to play again and compare the feeling in the muscles.
Structure of the skeleton
The spinal column is the frame of our torso, and the pelvis, hips, knees and feet support, in turn, the whole spinal column and the head. Our various muscles are attached to the spinal column, and we use these when we stand, sit and when we make music. There are, of course, muscles around the spinal column that stabilise and support it, and, as such, it is also these muscles that alter our position and actively decide our posture. The position of the spinal column depends entirely on the position adopted by the pelvis, hips, knees and feet. As you play, your arms need to be able to be relaxed, supported by the stabilising muscles around and in the shoulders. The muscles that stabilise the shoulder blade itself have great significance for how the arms are supported, and thus how they function. The work of these stabilising muscles is, in turn, completely dependent on how the shoulder blades rest on the rib cage. The posture of the rib cage, and thus the spinal column, is crucial for the position of the shoulder blades. The hips and the pelvis need to be held in a stable neutral position. Each person must find his or her own optimal position as an individual.
Both when we are sitting and when we are standing, we can consciously use our skeleton and see this as a basis for supporting ourselves to begin with, and then also to support our instruments or tools or whatever we are holding. The better we prepare ourselves and make ourselves aware of our skeleton, the less strain we will place on our muscles. If the skeleton is in a functional position, we will also use our postural musculature optimally. The postural musculature is suited to being able to function for a long time, to lie close to joints, and to actively assist other musculature systems (superficial and more peripheral musculature) when concentrating on, for example, handling an instrument. In order to achieve and find this upright reflex/posture we must also think about where stress and weight settles in the body. The ideal situation for the structures of the body is for weight to be placed as centrally as possible in the joints, no matter which joint is in question. Then the body’s structures have the possibility to function in the most effective position in which they have stamina, move smoothly and can develop the most power. This position facilitates collaboration between muscles around the joint so that there is a constant alternation of tension, relaxation, tension, relaxation, and not only the muscles of one side working constantly with the muscles on the other side being stretched. Agonist and antagonist assist one another.
To be aware of where centres of mass arise in the body is, therefore, another element we should know about and pay attention to. This happens quite well of its own accord if we have a suitable structure in our bodies. In general it can be said that we tend to place our centre of gravity too high up in the body. If we can move this lower down in the body, often somewhere between the navel and the pelvis, this allows musculature to be more in harmony and relaxed, as well as our stability improving radically. In addition to the skeleton and musculature, we also need to make ourselves aware of our breathing. If our breathing can spread out and feel deep and calm, this results in a more relaxed musculature. Breathing can help to lower the centre of gravity, make us calm and relaxed, and achieve smoothness, flow and harmony in our movements.
Harmony pertaining to movement and functionality does not only come from awareness and knowledge of physicality about how the body is adapted, but rather more about experiencing, feeling and strengthening physical awareness and experience. This is a never-ending process, which should continue throughout our lives, in constant change. Harmony in the body can be achieved when there is balance between the skeleton, musculature, breathing and mental challenges, and for this we need to be aware and attentive to a certain degree. This will provide you with an exciting quest and wonderful experiences throughout your whole life.
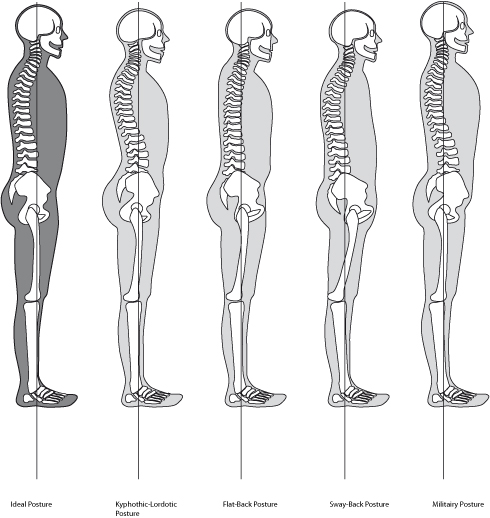
Illustration 1 - five different postures
How can I become physically aware in order to avoid dysfunction, and maintain harmony and functionality?
We will take the structure of the body step by step, working our way upwards with the physical parts of the body, skeleton and muscles.
The foot when standing
When standing, the foot is the only contact we have with the ground, and that contact is not particularly great. The foot is also the part that the whole body rests on, and it is important to use the soles of our feet optimally. The foot is constructed with an arch that allows flexibility and elasticity, which is conveyed further upwards in the body to achieve an easy gait. We employ this elasticity most often when we walk, but when we are standing still there is a risk that we might not use it fully. Elasticity/suspension is important for our circulation and breathing to function optimally, as well as for stamina in the whole body’s musculature. The musculature in the foot helps primarily to maintain the foot arch.
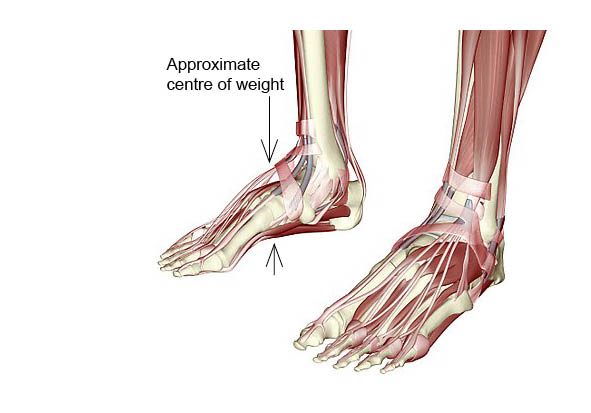
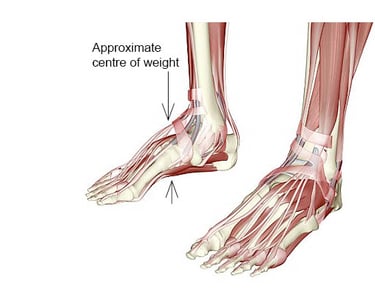
Illustration 2 – construction and centre of balance of the foot
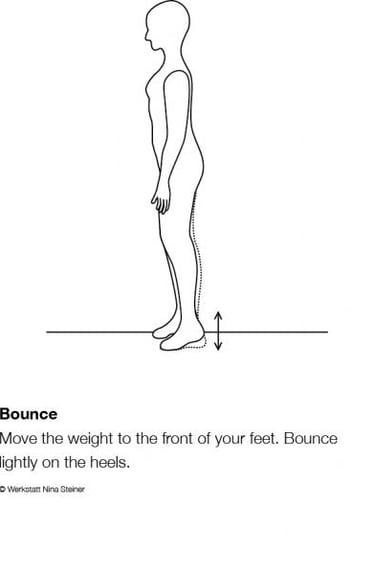
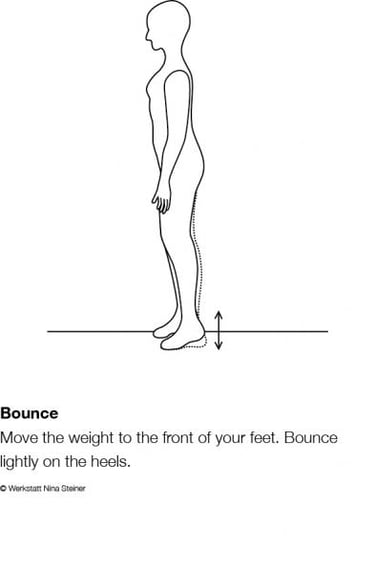
When standing still we should try to get the centre of balance to be as central as possible in each foot so that we can use the elasticity along both the length and breadth of the foot arch in the best way. What often happens when we are standing is that weight tends to rest on the heel. We have no elasticity in the heel, only a pad of fat and then the heel bone, so that area is relatively rigid. For example, when landing after a jump, we should not land on the heel. If we do land on the heel it will be sore and it will also result in discomfort further up in the lumbar spine. Even when we are standing still and, of course, do not have the same weight on the foot as when jumping, we are affected if the elasticity in the foot is not optimal. For this reason we should aim to have the weight in the middle of the foot so that we can access this elasticity. Furthermore, we will have more stability when the weight is in the middle, rather than when it is on the heel. If we stand with the weight on the heel, we will tend to lean backwards with decreased balance, and the centre of balance will rise. The same thing happens if we have the weight too far forward on the foot. This has repercussions on the level of tension in the thigh, stomach and neck musculature, which in turn can negatively affect the breathing, and if you play a wind instrument or are a singer, this directly affects your sound and stamina.
The weight on the foot should be in the middle of the triangle formed by the little toe, the big toe and the front part of the heel.
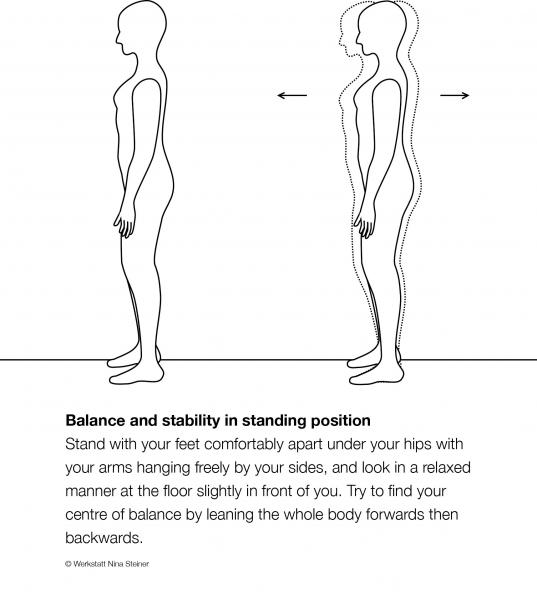
To find the weight and balance on the foot, try the exercises below.
Illustration of bounce and swing. Exercise 1

The knees in standing position
As everything in the body is connected, and one thing affects the other, our next stop is the knees. Exactly as in the foot, there is also an optimal position regarding cushioning and elasticity for the knees. The system here is not as complex as in the foot, nor is it comprised of so many small joints. Rather, it is a case of a single joint, and actually the largest joint in the body, which is, therefore, constructed to handle considerable weight. All joints have cartilage, which protects the surfaces of the joint, as well as being important for weight distribution and offering specific cushioning. The cartilage is thickest in the middle of the joint, and it is thus here, as centrally as possible, that we should position weight and stress. The starting point is again standing still, and if we continue up from the feet to the knees, then it is not unusual, if the weight is on the heel, for the risk of overstretching (bending back) of the knee to be increased. This is not the case for everyone, as we are all affected by our genetic inheritance, and certain people have a greater overflexibility than others, while yet others cannot overextend their joints at all. Notice that overflexibility in the knee can occur even if the weight is centred on the foot. If the knee is overextended, the weight will land on the front part of the knee joint, and here the articular cartilage is thinner and, as such, less resistant. Try, then, to let the knee joint be in a position where it is given room for some flexibility when you are standing still, so you are able to swing with the knees. Try the above exercise (Exercise 1) by overstretching your knee and then bending lightly, and notice if you experience any difference in terms of balance, breathing, flexibility, and centre of mass. Maintain the position where there is an openness and “oiliness” in the knees, and balance on the foot.
Now, when the balance lies in the middle of the foot, there is openness for the extension of elasticity through the knees. We will now, therefore, move on the next section, which is the pelvis in standing position.
The pelvis in standing position
The pelvis unites the lower body with the upper body. The legs are fastened via the hip joints to the pelvis (the hip joint is situated approximately in the groin), and the spine then wedges itself down between the two halves of the pelvis at the back – the SI (sacroiliac) joint.
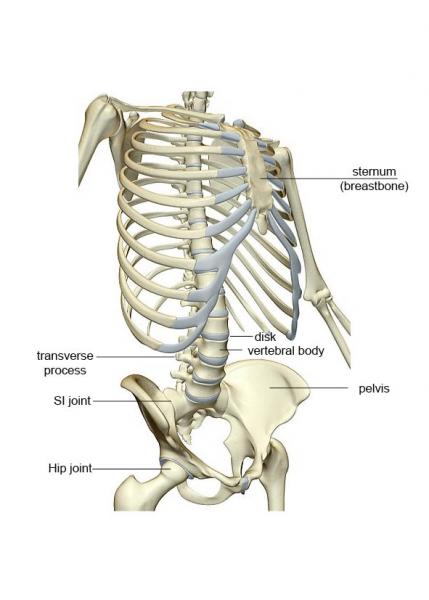
Illustration 3 – hip joint, pelvis, SI joint, etc.
We can tilt the pelvis forwards and backwards, and we can also move it in a circular, “hula hoop” movement. The position of the joints below, i.e. the ankle joint and knee joint, is also important for the pelvis in order to achieve optimal functionality (still in respect to standing position). If the knee joint is overstretched, it becomes heavier and more difficult to tilt and rotate the pelvis. Feel free to try this. Yet again, the efficiency of the structures around the pelvis is hampered, and the weight is focussed unfavourably, and the position prevents elasticity from continuing up into the body. When the knees are stretched too greatly, the pelvis often tilts forward, that is, the curvature in the back becomes greater. An increase in this curvature results in more pressure around the SI joint, and the spinous processes in the spine are pulled down against one another. The weight then falls more on these processes than the vertebral bodies themselves. Another position that can result in similar problems is when the hip joint locks. This occurs when the pelvis is pushed forward and involves, in general, the hip joint not being used for movement, and the weight through the joints then comes more from the back than from above (see Illustration 1). This is often seen in bass guitar and double bass players. The instrument rests against the hip and pelvis and unconsciously pushes the pelvis forward, pressing it against the instrument, and the hip locks. To achieve good support and elasticity via the pelvis, try to tilt it as far forwards as possible, that is, bend as much as you can, and then bend in the other direction, pulling the coccyx between the legs. Put one hand on the curve of the back and the other slightly below the navel and feel how the pelvis moves when you tilt it forwards and backwards. Stop somewhere in the middle between your outer positions and feel the flexibility, and that it is possible to move the pelvis in small, free movements.
The spine in standing position
As has already been mentioned, the position of the pelvis is important for where weight rests in the spine, i.e. more on the spinous processes or on the vertebral bodies. The spinous processes, which stretch out both to the sides from the vertebrae and also straight back, form a construction of articular surfaces that make various twisting, bending and stretching movements in our back possible. The muscles for these movements have very long muscle fibres between several vertebrae and short muscle fibres that stretch between single vertebrae and other areas in the back. When breathing, these muscles are active and one can notice a little movement, particularly in the transition between the lumbar spine and the pelvis. For the sake of our breathing, for its elasticity, and to avoid incorrect weight distribution, or trapped or slipped disks, the weight in the back should rest more between the vertebral bodies than on the spinous processes. The vertebral bodies also have joints between each other with cartilage; however, there are also disks here, fibrous tissue that helps to distribute pressure and weight as well as offering cushioning.
The spine’s curvature helps our mobility and absorbs weight in the back. In the lower part of the spine there is a curve; the back bends in towards the stomach, and then, in the thoracic spine, it bends in the opposite direction – a kyphosis. There is then another curve in the neck, a bend inwards. This curvature varies somewhat from person to person. It can also be increased, or alternatively decreased, due to incorrect functional positioning, disharmony in the musculature, illness, etc.

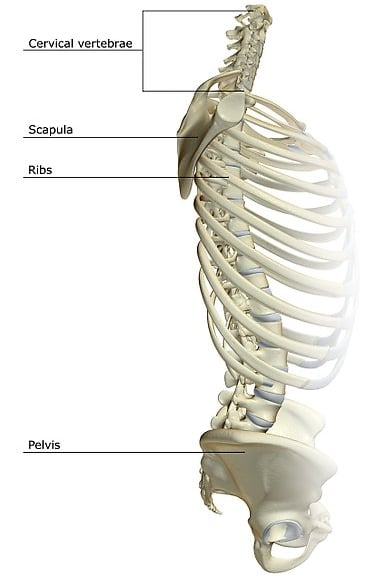
Illustration 5 – the spine and the rib cage
How the pelvis is tilted affects both the mobility of the vertebrae in the lower part of the back and the extent of the curve of the back. The position of the pelvis also affects the upper part of the spine, but that part, the thoracic spine, can also be affected by how we angle the breastbone. If we allow the breastbone to sink into the body, then the upper part of the back will become more rounded, the kyphosis increases and the shoulders slide forward, as does the head. We become, in general, somewhat heavy at the front. We hang more forwards in the spine, and the weight is not transferred straight through the spine via the vertebral bodies. Instead, the vertebral bodies are overburdened at the front, and the spinous processes are pulled apart. The distribution of weight is not optimal (see Illustration1).
If instead we actively push the breastbone forward, as though puffing out the chest, some of the kyphosis in the thoracic spine disappears, the curve in the lower part may increase, and the shoulders go back followed by the head, resulting in increased muscle tension over the larynx. Much of the musculature around shoulder blades and down the back is used for this position, the spinous processes become closer to each other and weight is distributed more through the back part of the spine than through the vertebral bodies. Breathing tightens and it becomes difficult for elasticity to reach upwards. One can even feel what happens with the whole rib cage, not only the breastbone – it angles forwards and then backwards. For the spine, then, there are two points we should be more conscious of. Firstly, the position of the pelvis is important for what happens, for the most part, in the lower back, and secondly, the position of the rib cage and the breastbone is important for what occurs at the top of the back and in the shoulders and neck. The most functional and optimal position for us is to find a middle position for these two different areas where one can rest upon the other instead of sliding away from each other.
Try now to discover the mobility that is possible in these two different levels in the back separately, and notice what happens depending on the position regarding breathing, balance, muscle activity, flexibility and stability. Then try to place one on top of the other and notice your stability and free breathing.
The shoulder blades in standing position
The shoulder blades form an ingenious construction that facilitates the great mobility we have in the shoulders. The extension of the shoulder blades upwards also constitutes the top of the joint for the condyle in the shoulder. The shoulder blade constitutes an important attachment of the whole shoulder joint to the rib cage, and has an important balancing function for movement of the shoulder joint and arm.
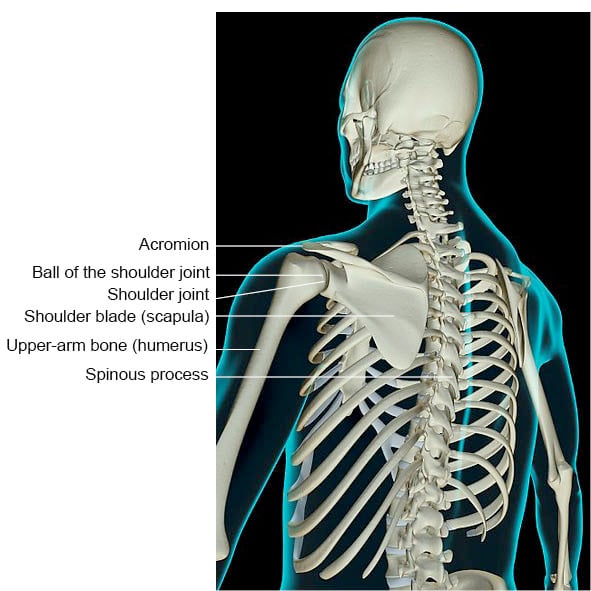
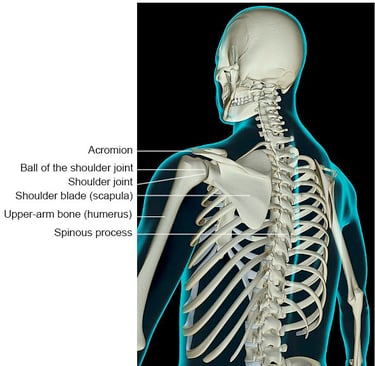
Illustration 6 – shoulder and shoulder joint
On and around the shoulder blade there are several muscles, and these help to keep the shoulder joints in a functional position. The shoulder blades and shoulders work closely together with each other. Feel what happens with the shoulders and shoulder blades when the thoracic spine is curved. The shoulders fall forwards and the shoulder blades slip out from the spine. Straighten the thoracic spine again, put one hand between the shoulder blades and locate the inner edge of the shoulder blade. Rotate the other arm forwards, outwards, upwards and then back, and feel how the shoulder blade follows depending on the movement.
In addition to helping the shoulder joints, the shoulder blade also supports and reinforces the whole arm. The better the position of the shoulder blade, and thus the support it offers, the more free the peripheral musculature out in the arm and hand will be to deal with the instrument. However, this depends on the shoulder blade finding the correct position. Due to its pliability, and also the fact that, for the most part, only muscles stabilise both the shoulder blades and the shoulder joint, an imbalance can easily arise in and around the shoulders. When problems arise in the hand and the arm, the problem and the source of the trouble often reside farther up in the shoulder or the shoulder blade. This usually depends, in part, on the position we have adopted in respect to the back and the pelvis, and partly due to the upper part of the trapezius muscle being too dominant, thus pulling the shoulder blade up and forcing the shoulder joints to slide forwards/upwards. This position carries the risk of pinching the structures around the shoulder joints (see the shoulder section).
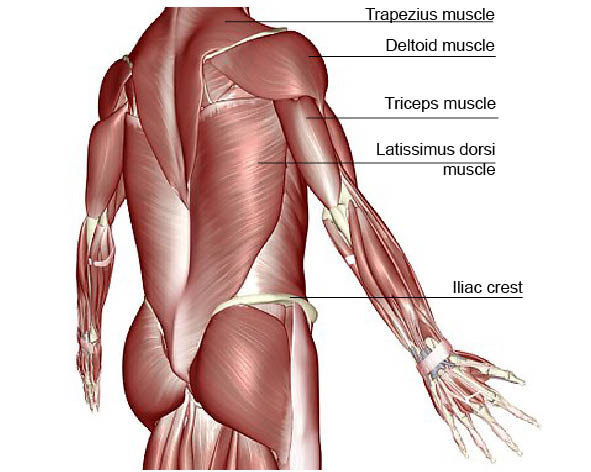

Illustration 7 – musculature of the back and shoulders
In order to be able to harness the great potential of the shoulders for movement and their ability to hold the arms, and thus instruments, we need muscles that can stabilise and balance these movements. Muscles often constitute working pairs influencing the same direction of movement. At the same time there are always muscles that, in each specific movement, have the opposite function, in order for the movement to be smooth and even. There are always several muscle groups in action at the same time, and it is when one of these muscles takes over the function and works more independently or in a more extended position that overstraining and pain can develop.
An important starting point in the function of the shoulders is that the shoulder blade, which stabilises movements, actually works in a stable manner, and has muscles that make sure it moves in close contact with its foundation, the rib cage. In particular, the muscle that stabilises the lower part of the shoulder blade – the serratus anterior muscle – has an important function. There are several muscles that also help to stabilise the shoulder blades – the trapezius, rhomboid and levator scapulae muscles. All of these are important components and, above all, it is the balance between their different degrees of activity that is crucial.
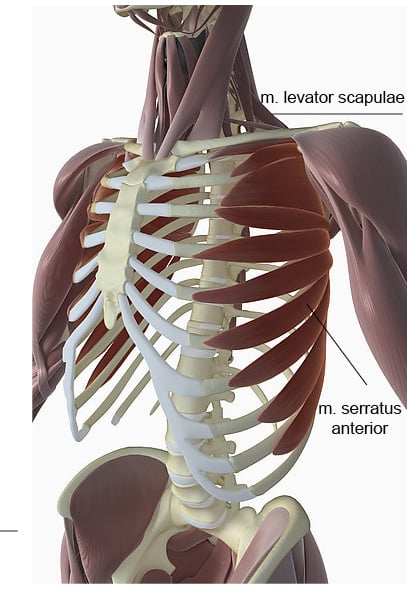
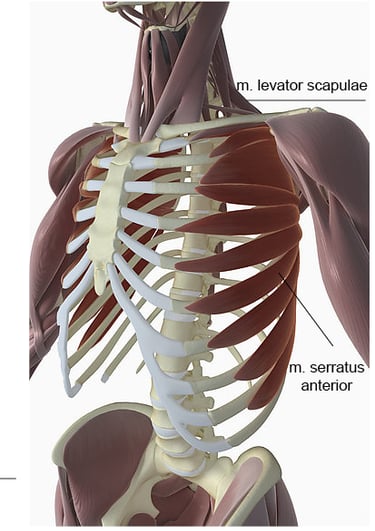
Illustration 8 – serratus anterior, etc.
It is possible to see from the position of the shoulders how adequate the balance is. When strain is put on muscles and movements are performed, it becomes clear whether there is an imbalance. If the shoulders are drawn back excessively, this often means that the muscles on the rear side of the shoulders are more active. The most usual case, however, is that the shoulders are drawn more towards the front, which results in the thoracic spine shrinking and the shoulder blades losing some contact with the rib cage. We then usually compensate by pushing forward the chin, and as a consequence there is an increase in curvature in the cervical spine.
Often the muscles between the shoulder blades (rhomboid muscles), the muscles that hold down the shoulder blade (for example, the lower part of the trapezius, and pectoralis minor) and the muscles that hold the shoulder blade close to the rib cage (serratus anterior, latissimus dorsi) need to be developed. Ideally this should be done under the supervision of a physiotherapist so that any existing imbalance does not continue to be developed. Since the musician holds his or her instrument in front of the body, and thus has the arms lifted to a lesser or greater degree, the shoulder blade often finds itself in a position where it is moving away from the spine. In this case, the muscles at the back will be used mostly in stretched positions, and the front muscles are more often pulled together. If the position of the shoulder and shoulder joint are not in balance, then the structures have to deal with more strain. For this reason, it is important as a musician to exercise the shoulder musculature and the musculature around the shoulder joints.
When you have an instrument that requires you to hold it up with your arms at all times, it is important for the shoulders and the arms to be supported by the skeleton and the supporting muscles. Here the posture and the position of the spinal column and the shoulder blades are crucial. It is important to be able to use the arms with a feeling of ease, working organically with the rest of the body, and to be able to vary the level of activity with the breathing, so that the muscles are able to vary their tension and function.
As a way to stabilise the shoulder blade and activate the musculature, particularly in the lower part of the shoulder blade try the exercis below:
First, try to hold the arms out in front of the body and feel the sensations of weight, support and stability in the arms. Then adopt the position below and see if you notice any difference in terms of support and stability for the arms when you lift them up in front of you again.
Exercise 2
• Sit or stand in a stable position. Let your arms fall to your sides and then rotate the arms out from the shoulder blades so that the thumbs point outwards and the palms forwards. Maintain this outward rotation during the whole movement.
• Curve the thoracic spine at the same time as you lift the shoulders forwards and up towards the ears and breathe out. Stay in this “ear position”.
• Find and adopt the medium position for the thoracic spine through inhalation. The activity comes from inside.
• Then let the shoulders sink slowly, and consciously try to feel that the musculature around the lower part of the shoulder blades is still active when the shoulders are down and the arms are again in the neutral position.
The shoulder in standing position
The shoulder joints with their surrounding muscles are the most normal place for problems for musicians. The arms are held up primarily by the musculature of the shoulders, and weight is then transferred to the whole skeleton. From the age of 40 onwards, the sensitive structures in the shoulder joints themselves become more clearly affected. Pain can also arise in several of the muscles around the shoulder joints themselves.
The shoulder joints have a very flat joint cavity and must rely primarily on the musculature in the joint cavity itself and around the shoulder and the shoulder blade to keep the joint centred. The shoulder joints consist of the condyle, which press against a frontal sinus, which only covers around 30% of the condyle. This is to allow a wide range of movement. The joint-capsule is thin and offers little stability. The ball of the joint is stabilised by tight bands of tendons; however, this is not enough, so the stabilising ability of the musculature is important. There is also a “ceiling” in this joint cavity – the acromion. This ceiling is a protruding part of the shoulder blade itself (see Illustration 6). The muscles that are located the farthest in, and which are attached to the condyle, form the rotator cuff musculature, consisting of the supraspinatus muscle, the infraspinatus muscle, the teres minor muscle and the subscapularis muscle. These muscles affect how the condyle orients itself with its various enclosing surfaces as it moves in different directions – outwards and upwards, and inwards and downwards. For example, when the arm moves upwards to shoulder level, the ball of the joint in the shoulder goes against the “ceiling” (acromion), the hard, flat part that is situated farthest out on the upper side of the shoulder. In this movement, the muscle tendons and other parts (nerves, ligaments and vessels) are pinched together. Nature has solved this by making the structures that pass through that area bend away, stretching themselves a little to make this pressing together possible, as long as the joint is centred. If not, there is an increased risk that these structures can become pinched. The rotator cuff’s muscle tendons that attach to the ball of the shoulder joint can become pressed in if the muscles outside the ball of the shoulder joint itself do not provide a good balancing function. If the outer muscles do not give enough stability, the condyle can then come too close to the very top of the bone and cause mechanical pressure and friction on these tendons, resulting in inflammation.
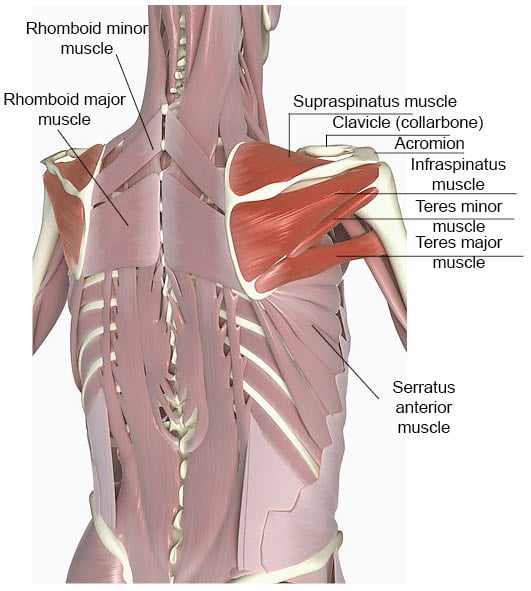
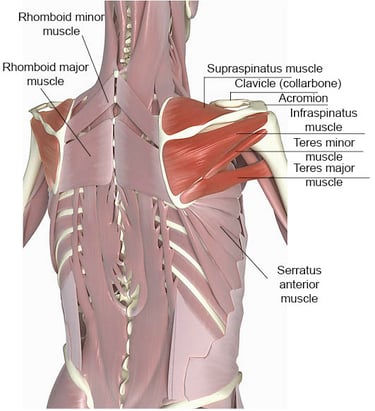
Illustration 9 – muscles of the rotator cuff musculature, etc.
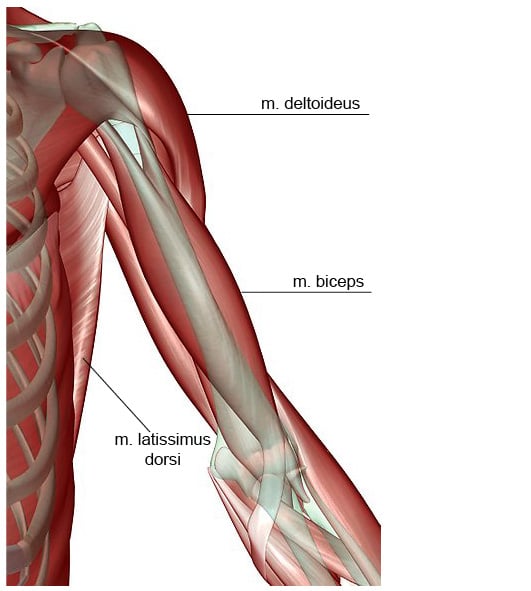
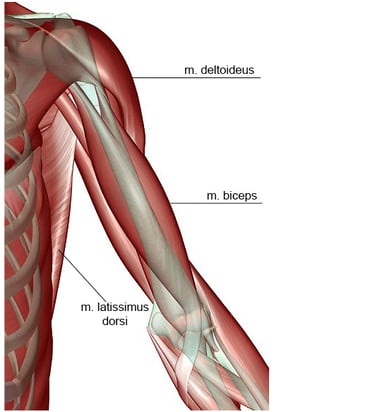
Illustration 10 – shoulder and upper-arm musculature
It has been pointed earlier out that, depending on how we choose to use our skeleton and its positions, there are repercussions for the function of the body. Regarding the shoulder, the position of the spinal column is important, as the shoulder moves forward if we adopt a more rounded position in the rib cage, or moves too far back if we adopt a position that is stretched too far upwards. That is to say, both the flat joint cavity and the posture make it more difficult to find a balance in the function of the muscles, and for the musculature to centre the joint. This then affects the ability of the passing structures, and they become trapped to a lesser or greater degree. Therefore, yet again, there must be adequate balance in the musculature around the shoulder and the shoulder blades. Stamina and strength are required in the musculature, but most important is to become aware of the musculature that holds the shoulder blade down and in, and the rotator cuff musculature, which centres the condyle in the shoulder. It should be emphasised here that the musculature on the front side of the shoulder, the pectoral musculature, can at times, due to its shortening, cause the shoulder joints to be forced forwards, and it can therefore be necessary to stretch the muscle, and/or tighten the rear of the capsule of the shoulder joints, therefore pushing the shoulder joints forward.
The arm
Within the musculature of the upper arms are the biceps, which also affect the shoulder joints and their stability. The biceps consist of two parts: the first part gives stability directed downwards during movement, and the other has a stabilising power directed upwards.
The forearm incorporates almost all the muscles for the hand and fingers – the flexors and extensors of the wrist and finger joints. The flexors of the fingers are, in general, always stronger than the extensors. These extensor muscles and their attachment on the outer condyle of the elbow are a common source of pain. However, one can also have similar problems in the attachment of the flexors at the inner elbow condyle. This is something that can happen when the fingers work under pressure, for example the left hand and fingers of string musicians.
We also have muscles in the forearms that rotate the forearm in relation to the upper arm. These muscles can become overstrained in pianists, and can sometimes feel like a stiff band in the upper part of the forearm. Overstraining comes from the rotation that is needed to turn the palm towards the keys coming only from the forearm. This can be alleviated by making this rotation with the help of the shoulder blade and shoulder (see the Piano Ergonomics section).


Illustration 11 – musculature of the arm

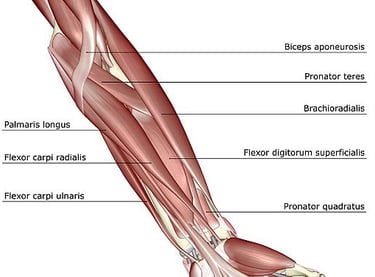
Illustration 12 – musculature of the forearm
The hand
We can have more access to the hand’s potential for power and stamina if it is in a position where the wrist itself is angled upwards at about 15 degrees, and the knuckles can be seen clearly, as well as there being an easy, relaxed curvature in all finger joints.

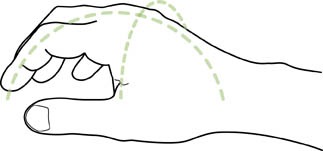
Illustration 13 – the hands at rest + the arch
The anatomy of the hands consists of small bones combined in such a way that, together with muscles and ligaments, they form two different arches. The longitudinal arch is important to be able to maintain and produce power and stamina, and to get the most out of finger activity. The attachment of the fingers in the hand with its arch provides a stable base for the fingers. After this, it is primarily the musculature in the forearms that produce the movements of the fingers. Most of the muscles that extend and flex in the fingers are at their fullest in the forearm and when they reach the hand they are like tendons (see Illustration 12). The transverse arch is held in position with the help of the muscles between the finger bones in the back of the hand – the lumbricals. They maintain a stability of function in the hand so that the knuckles are always visible. If the knuckles sink into the hand so that they are no longer visible, which can happen from playing piano, for example, this results in an increase in muscle strain, especially in the finger extensors.
Illustration 14 – forearm and hand
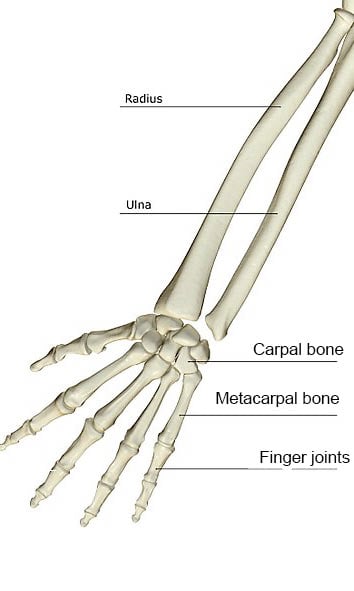

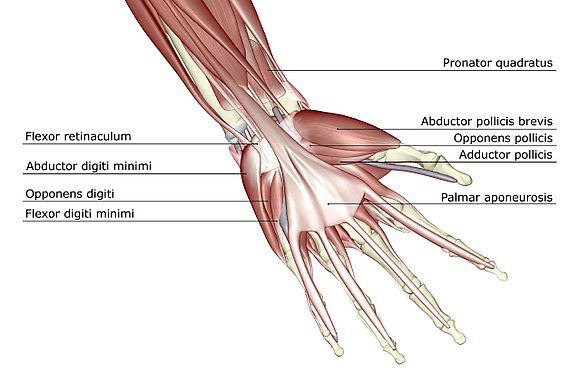
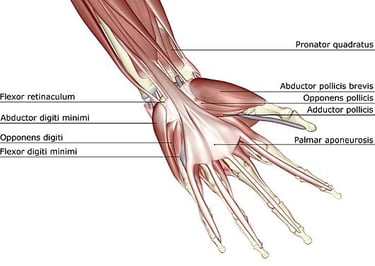
Illustration 15 – hand musculature
When we stretch the middle joints in the fingers, we increase the activity in exactly those muscles that “spread and join together the fingers from the sides”. When we stretch the “knuckle joints”, i.e. when the knuckles “disappear”, the activity in the muscles in the upper forearms increases and this can easily result in tension in this area. We can access the hand’s potential for power and stamina more easily if the position of the hand is closer to the position of rest.
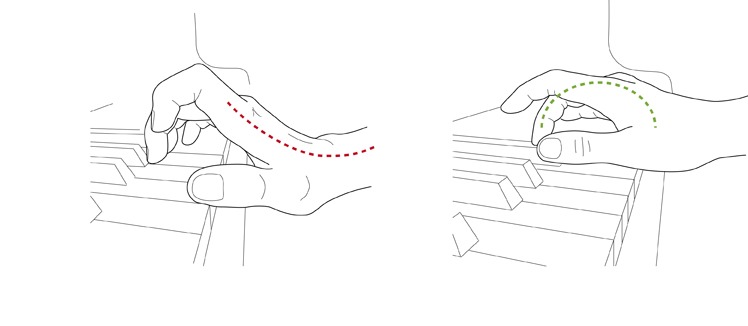
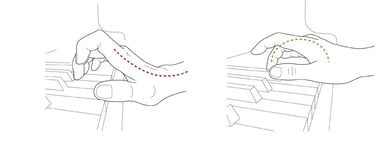
Illustration 16 – overstretched and neutral positions in the finger joints and wrist
The extensor tendons in the fingers are unified, that is, they all originate from the same body of muscle. One exception is the index finger, which has a separate extensor tendon, and the little finger can also stretch separately. The ring finger is the weakest finger in terms of stretching separately. Try to let the middle finger or the little finger follow along when you move the ring finger and observe the difference in ability. For the flexor tendons there are two different types of flexors, where one type, the superficial flexor tendons, have their individual origins in different muscle bodies and contribute to the individual abilities of the fingers to flex in the middle joints of the fingers, where they are also attached. The others, the deep flexor tendons, issue from the same muscle body in the forearm and can therefore not bend separately in the outer joints of the fingers. Occasionally, the superficial flexor tendon in the little finger is missing. In this case, the ability for movement in the little finger is reduced.
There are important muscles situated in the hand itself, such as the muscle that is situated between the bone of the index finger and the bone of the thumb, which allows the thumb to hold objects, for example between the index finger and the thumb. This muscle can at times be too dominant, especially if the “thumb extensors” are strong and the “thumb flexors” are weak. This can easily result in overstretching in the base joint of the thumb, and the area directly beneath falls into the hand. During the stretching/overstretching of the thumb’s joints while gripping, this muscle activates, which also affects the fingers’ ability for relaxed movement in terms of extending and flexing. Try to lay your forearm on the table and stretch all the joints of the thumb strongly; at the same time try to flex and extend your fingers. How does the movement of the fingers feel compared to when the thumb is relaxed? A stretched thumb causes tension in the muscles, both in the muscle that draws the thumb in towards the hand as well as those that keep the thumb stretched.
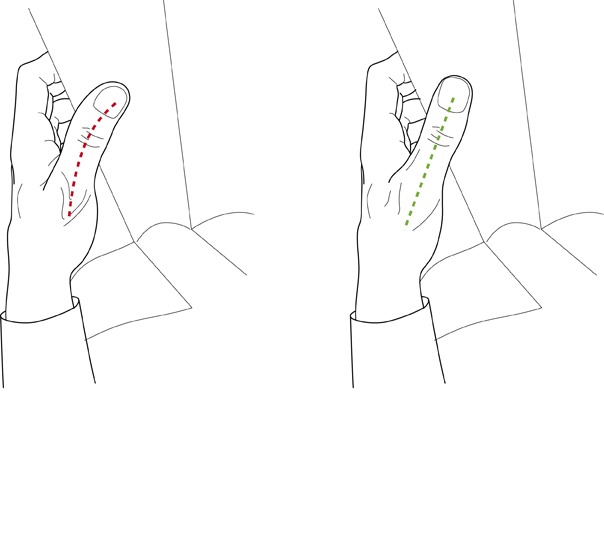
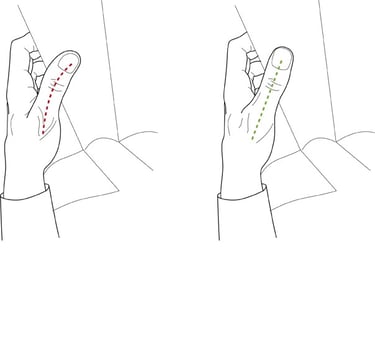
Illustration 17 – overstretched and neutral positions in the thumb
The dilemma regarding the dominant thumb muscle is that the hand was originally designed to be able to hang onto tree branches (as apes). The grip reflex is strong in small children, and as adults we have the remnants of this grip reflex, which always activates the thumb in the grip of the hand when the fingers are performing movements. This is something most instrumentalists need to “unlearn” in order to affect the degree of activity in the thumb and fingers. If you play a bowed or plucked string instrument, especially regarding your left hand, it is important that your thumb is as relaxed and flexible as possible in your movements, otherwise there can often be increased tension around the muscles of the thumb, which can, over time, result in increased tension in the musculature of the hand and arm. How high the level of activity in the muscles of the thumb reaches is crucial in maintaining a relaxed hand-arm motor activity for most instrumentalists. Forming a ring with the thumb and index finger grip is an ideal starting point. There is another muscle in the hand that is worth mentioning – the abductor digiti minimi muscle. This is an important muscle on the side of the little finger that allows the little finger to move outwards. For the other fingers, there are muscles that spread out and pull together the fingers between the finger bones in the middle of the hand.
We are now approaching the final stop on our journey of discovery and awareness through the body, with only the neck and head in standing position remaining.
The neck and the head in standing position
The spinal column continues up to the head via a small curve and then ends with a ring-shaped vertebra with two small joint surfaces upon which the head rests. The head rests on the uppermost neck vertebra, the atlas vertebra, which is shaped like a bowl. During more strenuous bending movements of the head forwards, to the sides or twisting, the skull’s surface against the uppermost vertebra is insufficient for full stability, and for this reason muscles are activated to stabilise the head. The scalene muscles on the front side of the neck hold in the chin, and the suboccipital muscles assist in stretching the head backwards. The head is heavy, around 6–8 kg, and this knowledge alone can be reason to try to position the head so centrally and as balanced as possible in order to minimise unnecessary muscle activity. Try to collapse the body inwards, and round the back. The head will then fall and hang forwards. To stretch the head upwards from this position and look straight ahead demands a great deal of muscle activity in the neck.
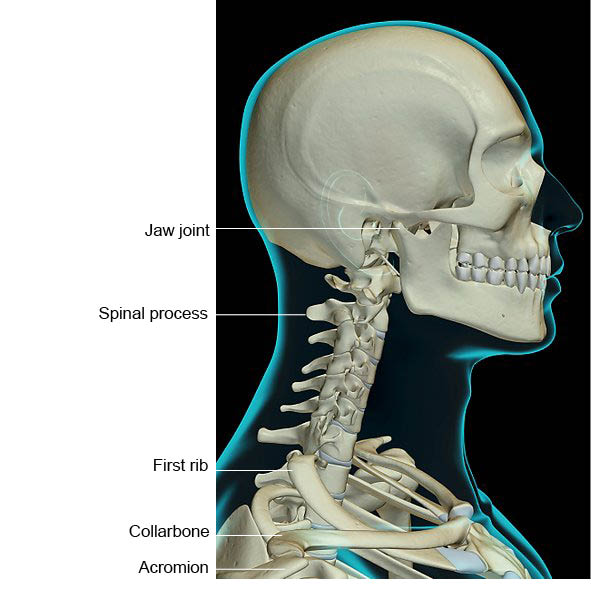
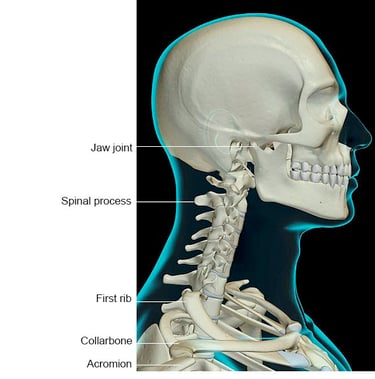
Illustration 18 - neck
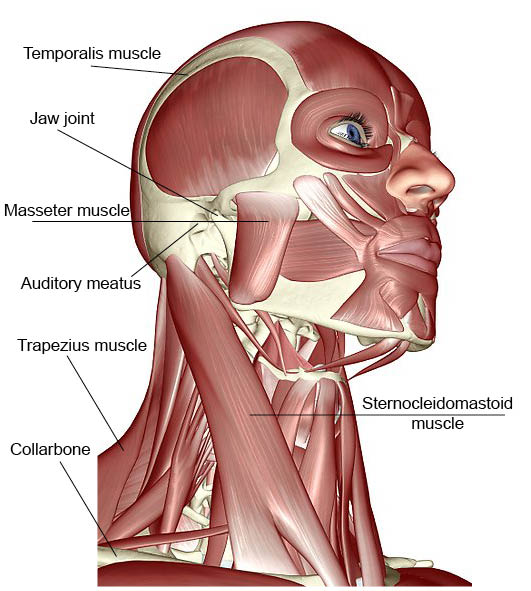
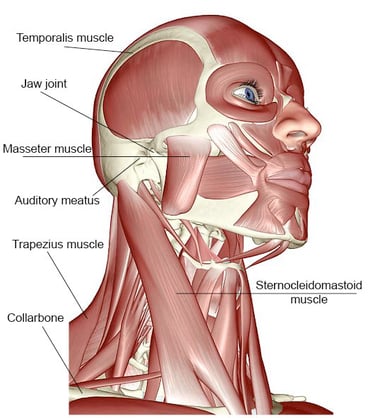
Illustration 19 – facial and neck musculatur
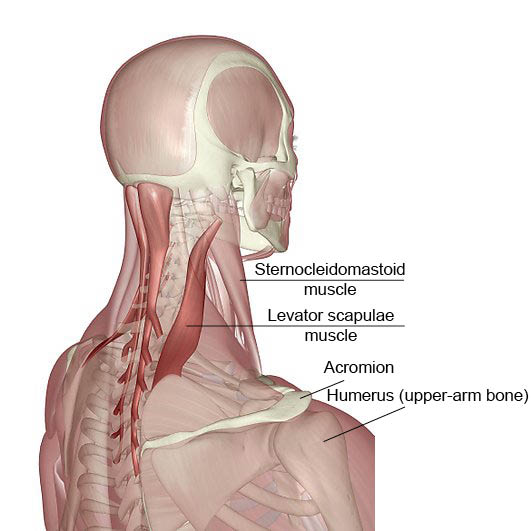
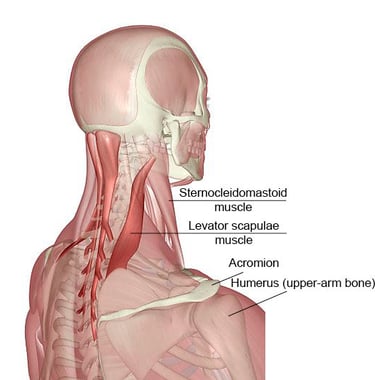
Illustration 20 – neck and throat musculature
As our eyes are situated at the top of our body, the head is the part of our body that we use for controlling and monitoring. It is natural for us to want to see what is happening and at times let our sight lead the head, which is why it comes before the body. This is somewhat more common in the sitting position, for example when we are reading sheet music, or sitting at the piano or computer. If the head comes in front of the body and does not receive optimal support from the spinal column, the body tries to balance itself, compensating in the thoracic spine and pelvis so that we end up in a hunched position. This results in more unfavourable positions, which in turn have effects in terms of functionality and stamina, as discussed earlier.
A common unconscious placing of the head, above all in wind players, is to let the head move forward towards the instrument. The result is that the head slides forwards and the centre of balance shifts to in front of the spinal column, and the curvature of the neck, or the kyphosis of the thoracic spine, increases with high muscle activity in the neck, as above. It also becomes more difficult to hold the arms up in this position. Try, therefore, as a wind player, to form the habit of moving the instrument to the mouth so the head can maintain its position on top of the spinal column. Around the neck and the throat we also have musculature that connects the rib cage and the head to one another, the musculature that makes it possible for us to bend and turn the head. The muscles are strained to a greater or lesser degree depending on what position the head is in. Depending on different types of instruments, it may be necessary for us to position the head slightly turned or tilted. We should try to do this as little as possible as it results in particularly heavy strain and can affect both the tension in the jaws, the position/functioning of the rib cage and the breathing.
The trapezius muscle in the neck can pull the shoulder upwards towards the ears but also pull the head to the side and stretch backwards. The lower part of this muscle helps to stabilise the shoulder blades. The levator scapulae muscle goes between the transverse processes of the neck and down to the point of the shoulder blade, and bends the head to the back and to the side. It is not unusual for this muscle to be the location for torticollis (wryneck).
The jaws
Begin by clenching your jaws as much as you can and then notice your breathing. Does it feel tense or relaxed? Now release the tension and clenching, and let the lower jaw fall naturally. What happens with your breathing? This experience is often described as if the breathing is “taking an elevator ride” down towards the stomach, becoming more free and spacious.
The musculature around the jaws has an enormous capacity of strength despite its small size. The jaw muscle (the masseter muscle, see Illustration 16) is a muscle that is often tensed when there is a feeling of stress or discomfort, in situations where we are trying to “regain control”. It is also the case that, if the position of the body is such that the head has moved outside of its line of balance, gravity tries to pull the lower jaw downwards to open the mouth. Unconsciously, we do not want this to happen. We do not want to sit with the mouth open, and for this reason we close the mouth, i.e. we tense the jaw muscle to keep the mouth closed. This results in an increase in muscle tension, as well as causing a negative effect on the breathing. Yet again, the position of the body is important for the level of tension and breathing capacity.
The tension around the jaws can at times become too strong, for example when the lips close tightly around different types of mouthpieces, even if the posture is stable and balanced. Here the musculature around the mouth and lips is also important. As such, try to form the habit to also be aware of how much power is needed and try occasionally to lessen the power intensity/muscle tension.
Now we will move on and learn about the body in sitting position.
The feet and legs in sitting position
In sitting position we have a larger base area of contact than in standing position. It is usually the buttocks and the back that are supported by the chair. If we want to be able to sit without the support of the backrest and have the weight through the vertebral bodies and down to the base, the pelvis and legs need to be involved. In order to hold the back upright and maintain the position of the pelvis while in sitting position, we should place more weight on the legs than we might think. If we can allow the legs to take more of the torso’s weight, the strain of the weight will not be placed on the pelvis alone. If the weight is placed solely on the pelvis, we will soon be unable to hold ourselves up against gravity, and the pelvis will move backwards, or alternatively, we will fight against this force and bend upwards with too much tension in the muscles as a result. If we allow the legs to take a part of the weight, the pelvis will be able to remain in the same position and increase stability in the back, and we will not fall backwards as easily. In order to have the weight distributed through the legs, we should lean slightly forwards with the torso so that the legs form a surface of relief of stress for the torso. This leaning/movement forwards comes from the hip joints. This position is not relevant if you are an organist or a drummer, however. For these instruments, the legs need to be free in order to take care of the pedals, and the weight and balance must come through the pelvis. It is, therefore, important for such instrumentalists to train their stomach and back musculature.
The pelvis in sitting position
In order to distribute the weight and be able to use our legs, we need to move the pelvis in more of a curved motion, and thus feel that we are sitting on the ischia (the curved bones at the base of the pelvis). Feel what happens in the spine, the shoulders, the shoulder blades, the neck and the head when you allow the pelvis to rock backwards and forwards. Let the pelvis lean fully back, and then fully upwards in a curve, gradually make this movement smaller and smaller, and then stop in a medium position. After this, try to become aware of the ability of your hip joints to move. Test this by folding the torso forwards a little via the hip joints over the legs and then back again, rolling over the ischia. The hip joints are large and stable, and can easily take the weight. You can also try to move the torso in a circular movement and consciously feel the buttocks as a balancing plate upon which it is possible to balance freely and in a relaxed manner.

The shoulder blades in sitting position
The same applies as for standing position.
The shoulders in sitting position
The same applies as for standing position.
The arm
The same applies as for standing position.
The hand
The same applies as for standing position.
The neck and the head in sitting position
The same applies as for standing position; however, in respect to the fact that the head tends to fall forwards, it can easily occur that we are more used to the head being heavier at the front without feeling the muscle activity in the neck. We are not usually aware of how much muscle power is needed in the back of the neck in order to hold the head up. Try to feel this by sitting with a rounded back and the shoulders forward, and allow the head to fall forwards down towards the rib cage. Then lift the head and feel the muscle activity that is required by the neck musculature to lift the head in order to look straight ahead. The suboccipital muscles and the muscles of the jaws and the root of the tongue are all linked, so that if one is tense, then the others will also be tense. By holding the head in a balanced position, tension also decreases in the jaw muscle and in the musculature in the root of the tongue. Tension in these muscles also affects the windpipe, our breathing capacity and the diaphragm.
The diaphragm
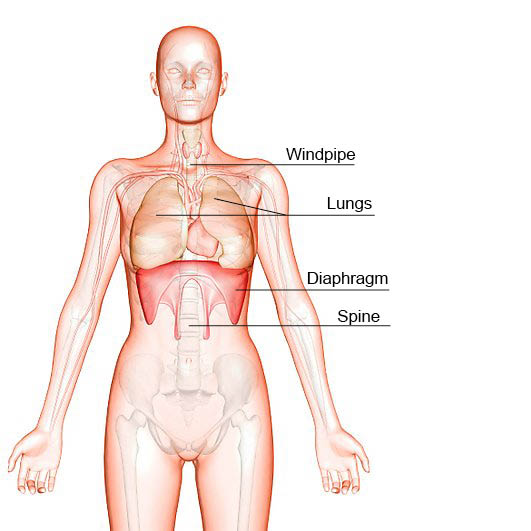

Illustration 21 – the diaphragm
The diaphragm is primarily an inhalation muscle that helps to bring air into the lungs. When the diaphragm pulls itself in and moves down, an underpressure is created that draws air down into the lungs and fills the rib cage. For this movement to be developed, it is necessary for the hip flexor, which originates in the transverse processes in the lumbar vertebrae above, as well as the inside of the pelvis, to release their activity. The hip flexor affects the lumbar spine’s ability to bend, the curve of the hips and the position of the pelvis. The muscle affects the tension in the lower part of the abdomen/back very strongly. If you try to release the ability of the psoas muscles to bend in the hip, then the tension in the abdominal musculature will be released and breathing will become deeper. The abdominal muscles need to be able to expand when the air comes into the whole rib cage and the contents of the abdomen should leave space for the expansion of the diaphragm downwards.
Breathing out is a passive activity, but if you really want to empty the lungs of air, the muscles that sit between the ribs are used, and also the abdominal muscles themselves, the pelvic floor and the hip flexor. The pelvis muscles are also important for breathing. They form the bottom of the actual “bellows”. You can perhaps experience their activity yourself if you try producing sounds such as “sp, sp, sp”. The diaphragm is primarily our inhalation muscle and takes care of breathing in. When we need to take in more air, and to do so more quickly, then the diaphragm is assisted by the neck muscles, chest muscles and ribcage musculature (compared to when we are physically active). If we are anxious or stressed, our breathing can become shallow and rise into the rib cage, and these muscles then join in and help. If this is recurrent and continuous, the body becomes used to breathing more with these assisting muscles than with the diaphragm, and a new pattern of breathing is created in which we have become used to breathing in a more shallow way. This is not very practical in the long run, so try to get used to questioning your own breathing patterns from time to time, and remind your body that the diaphragm should be doing most of the work during inhalation, so the assisting muscles can relax.
An exchange of air then occurs in the lungs in which oxygen is transported into the blood and other waste is carried out with the exhalation air. To have functional breathing in which the exchange of oxygen and waste can occur is a great help for our stamina, both in our muscles and in our mind. Approximately 70% of the body’s residue products, which remain after various processes of combustion in the body, exit with the exhalation. The rest disappears via the skin, the bladder and intestine, and in exactly this order. If this breathing exchange is limited or worsened, there will be consequences, for example in the circulation of the musculature, which then worsens and the pH level in the muscles also worsens, becoming more acidic. If the pH level falls, the muscles tighten and become stiff, and the circulation worsens further, increasing the risk of pain. For this reason, it is good to become aware about your breathing and prepare yourself, both with specific breathing exercises and with movements that increase the circulation. See the chapter on specific exercises.
The diaphragm muscle also directly affects our emotional life and reacts directly to whichever demands, strains and emotions we are subjected to. It can then become tense, preparing itself for a flight-or-fight reaction. (See the chapter on stress).
The diaphragm also has an indirect function in helping the stomach and intestines keep in good condition. When we breathe in, the muscle tightens and sinks. In order for this to happen, the stomach and intestines must be pushed aside, which is why the stomach rises and bulges out during inhalation, massaging the contents of the stomach, if the hip flexor and abdominal muscles are relaxed. Digestion is aided by the diaphragm and the breathing in order to function optimally. When the breathing is tense, suppressed or shallow, this has consequences for mental and muscular stamina and for digestion. Remember that breathing reacts directly to muscle tension, similar to the tension in the jaw as mentioned earlier; however, the opposite direction is also true. If your breathing becomes deeper and freer, muscle tension can also decrease. As such, breathing and muscle tension are intimately connected with one another. Yet another ability that the breathing has is to let itself be controlled at the same time as it continues completely automatically. As mentioned in the section on the pelvis, the position of the body is extremely important for how practical it is for the diaphragm to function.
Try again to feel how the distribution of breathing changes according to which position is adopted. Then maintain the position that feels best. Try to feel what happens in the body, that is, what rises and what falls, expands and contracts if you focus on your breathing and its ability to spread out by focusing on the rib cage, down towards the stomach and pelvis, towards the waist and finally in the back.
Conclusion
We cannot expect to always be in a single optimal position. The body would not be able to cope with this, but rather requires change and stimulation. However, by developing our physical awareness we can give the body more options, feel safe in various positions and feel more quickly when we find ourselves in possibly adverse body positions. The body can handle a great deal; it does not feel immediately bad or find itself in severe difficulties if it occasionally finds itself slightly out of position. The ability to handle this depends on time, power, and again, position – in short, physical awareness. We must also consider that the structure of our day varies, so the body has more energy at certain times and less at others. This is completely natural and for this reason it is not possible to constantly demand exactly the same experience or ability day after day. Instead we need to develop ourselves to be able to handle this change and feel satisfied to be able to perform, even if this ability comes and goes in waves. If you are interested in learning more about anatomy and muscles, we recommend anatomy books by Netter or Sobotta.
Shorter manual to achieve a functional skeletal structure and postural musculature
Standing position
• Start by making yourself aware of your feet.
• Tread on the spot and feel your feet against the floor.
• Tense your knees backwards, then release and bend them a little.
• Allow the knees to be loose and free. Rock them back and forth.
• Tip the pelvis forwards, backwards and around, and find a free and open middle position.
• Curve the thoracic spine and stretch backwards; then stop about halfway in between.
• Twist and shake off tension along the spine.
• Position the shoulder joints and the shoulders by rotating the thumbs outwards, curve the thoracic spine, pull up the shoulders towards the ears and find your way back to a middle position for the thoracic spine. Then slowly release the shoulders downwards and let the thumbs rotate back to their normal position.
• Slide the head forwards as far as possible, but maintain the position of the rib cage. Then slide the head backwards as far as possible and relax. This usually helps the head to find a natural balance. You can also imagine your chin becoming heavy.
• Pay attention to your breathing for a moment.
• Go down to your feet again and swing back and forth a little to find the centre of balance in the middle of the foot. Then release the heels and bounce up and down for a moment.
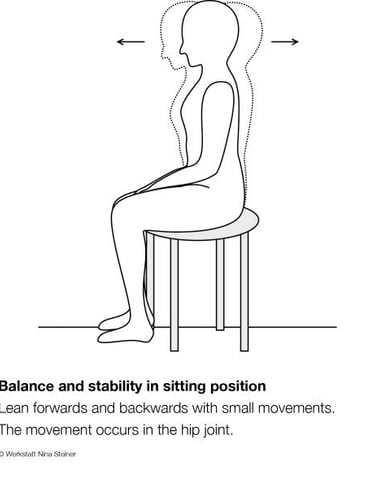
Standing stability

Sitting position
• Sit with the soles of both feet in contact with the floor. Tread on the spot a few times and feel the natural position for the feet and legs.
• Press the knees together and then relax them; do this a number of times.
• Rock up and down on the pelvis a few times. Feel the outer positions, both forwards and backwards, and then stop about halfway in between.
• Curve the thoracic spine and stretch backwards, and then stop about halfway in between.
• Then fold your torso over from the hip joint slightly forwards over your legs. You can swing a little forwards and backwards, and then stop where you feel the legs are supporting you.
• Twist and shake off tension along the spine.
• Position the shoulder joints and the shoulders by rotating the thumbs outwards, curve the thoracic spine, pull up the shoulders towards the ears and find your way back to a middle position for the thoracic spine. Then slowly release the shoulders downwards and let the thumbs rotate back to their normal position.
• Slide the head forwards as far as possible, but maintain the position of the rib cage. Then slide the head backwards as far as possible and relax. This usually helps the head to find a natural balance. You can also imagine your chin becoming heavy.
• Pay attention to your breathing for a moment.
• Then think of the pelvis as a balancing plate (with the feet offering support). Move the centre of balance in your buttocks in a round movement and pay attention to the feeling of rest and relaxation in the torso.
Sitting stability

3. Ergonomic advice for specific instruments
This chapter forms a basis for discussion and reflection on minimising physical stress.
Opinions are welcomed. (This chapter is currently being revised.)
Ergonomic advice on sitting and standing
We recommend that you watch the videos on sitting and standing stability.
The videos are available with English subtitles and you must start the video and then click on subtitles and then go to settings and select the language.
Some starting points for all instrumentalists:
In order for your shoulders/arms to cope well with the strain of playing the instrument, start by going through the exercises for sitting and standing. Check out video sitting stability and video standing stability, so that the shoulder blade muscles provide good stability and create a feeling of lightness in the arms. Make sure that your shoulders and shoulder blades are in as symmetrical a position as possible.
If possible, try to balance the weight of the instrument on both hands/arms, and perhaps use a carrying strap or other support aids to relieve the strain.
Hand, thumb, and forearm problems are relatively common, and training the stability of the hand and fingers can easily be overlooked. Under Hand exercises - video you will find tips on how to exercise your hands.
and starting points for all wind instrument players:
Once you have found a good position for your upper body, shoulders, and cervical spine, it is important to bring the instrument to your lips and not the other way around. This is to avoid increased “swan neck” in the cervical spine and with it muscle tension around the larynx and increased strain on the cervical discs.
Now it's time to find a relaxed upper body so that breathing and airflow work well. All types of exercises to achieve this are allowed, from moving your arms and legs to get your breathing and pulse going, to more gentle exercises such as yoga. The goal is for the diaphragm to function dynamically, so that there is no resistance in the respiratory muscles. This requires a stable upper body, where the spine rests securely on the pelvis.
When you start to engage the instrument, look for support in the pelvic floor. If this is difficult to find, try using a “twooooo” sound and let the air flow at the same time. Try to keep your abdominal muscles relaxed and pay attention to what is happening in your pelvic floor. Walk around the room and let the air flow in and out. It should be like a single circular movement. There is no stopping.
3.1 Violin/viola Ergonomics
Position of the body with and without instrument
A posture that offers good support for the shoulder muscles and a stable position for the shoulder blades against the rib cage is vital for avoiding muscle problems in the shoulders and neck. Here is an exercise for this: stand in a stable position with feet a comfortable distance apart from each other (under the hips), without locking the knees. Shift your weight and balance first on your right foot and then your left, feeling freedom towards the left when on the left foot, and to the right when on the right foot. When you have the same feeling of balance on both feet, the activity of playing will come from the centre of the body. Stretch the whole body and arms/hands straight up as far as you can. Then bring both arms down at the same time to a relaxed position with a 90-degree bend in the elbow and a 60-degree angle with the arms outwards.
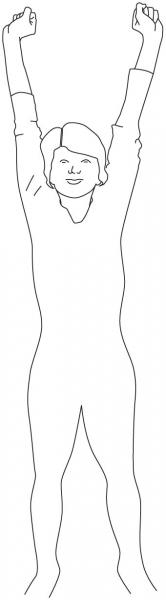

Illustration 3.1.1 Stand in a stable position with your feet as far apart as your shoulders, and then stretch up as far as you can with the hands. Take a deep breath. Now simply let the air out and let the arms fall to a natural bend in the elbows.
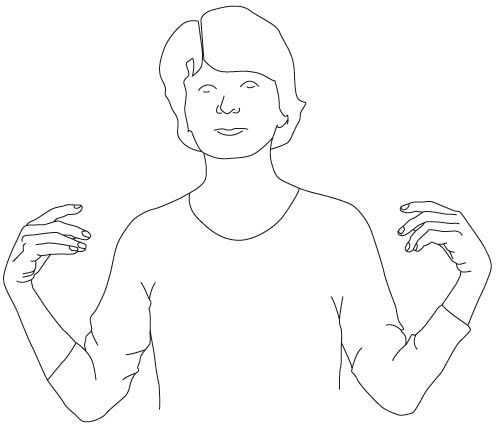
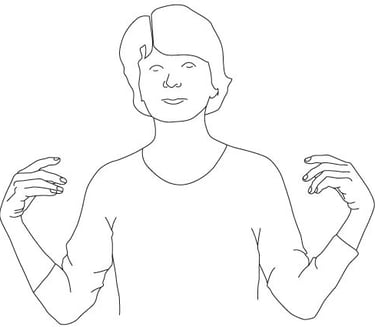
Illustration. 3.1.2 Now the arms have fallen into a resting position with elbows bent. The rest of the body’s posture should be as before.

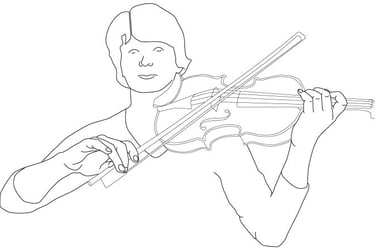
Illustration 3.1.3 From the previous position, now take your instrument with the same feeling in the shoulders, arms and the rest of the body.
This is a good starting position for playing the violin. It is also crucial that there is symmetry in the activity of both shoulders, i.e. that one shoulder is not pulled forwards while playing. If not, there will be extra strain placed on the condyle of the shoulder joint, and on the tendons that fasten there.
This is a good starting position for playing the violin. It is also crucial that there is symmetry in the activity of both shoulders, i.e. that one shoulder is not pulled forwards while playing. If not, there will be extra strain placed on the condyle of the shoulder joint, and on the tendons that fasten there.
For the correct positioning of the body in sitting and standing positions, please also see video about video standing stability and video sitting stability. There is also a short film about violin playing, which you can find here: video violin playing.
Adjusting the rests on the instrument
When you bring the instrument to your body, begin by adjusting both the chin rest and the shoulder rest. Try to position the shoulders/shoulder blades symmetrically. Avoid constant twisting and bending to the sides in the cervical spine, as this entails increased strain on parts of the cervical spine, in the discs and on certain muscles. In this case, the muscles become shorter over time on the bent/twisted side than on the other side, and wear and tear on the discs and tendons of the cervical vertebrae is also worse than on the opposite side.
The goal is to make use of the weight of the head so that you avoid the feeling of needing to press down tightly on the violin. Simply allow the head to rest with all its weight on the chin rest without any muscle power. Try to find a height for the rest where you do not constantly need to bend the cervical spine to the side. The chin rest should be shaped so that you have a good and comfortable grip with the cheekbone and chin, and so you can vary how you position your head.
Begin by taking off the shoulder rest and let someone else place the instrument on your collarbone, still without trying to hold the violin firmly under your chin. Feel your way to the correct angle of the instrument (approximately 45 degrees) when playing with the bow. Examine how much height needs to be compensated for – first with the shoulder rest and then the chin rest. Feel free to use something to measure with so you can adjust the rests to fit perfectly. Be careful not to overcompensate in height for the chin, but rather allow there to be flexibility to change the position of the head; make sure there is still room to turn your head or bend it over to the side in order to be mobile and flexible as you play.
A long neck requires a higher chin rest, while a sloping shoulder requires a higher shoulder rest.
At the music stand
In ensemble situations, for example when you are sitting in front of a music stand, you may have to rotate the instrument in order to achieve good contact with colleagues, the conductor and with the sheet music itself. In such cases, try to rotate your body from below, i.e. from the pelvis and hips, not from higher up around the shoulder blades. To be able to rotate the chair that you are sitting on would be ideal. Use an active sitting position when you play, that is, to play without the back support of the chair, but with a stable upper body. From a stable starting position, you can vary your balance forwards, backwards and to the sides, and in this way vary the positioning of your centre of mass.
Balance with the bow and the positioning of the instrument
Examine the balance between the bow and the positioning of the instrument. Try to achieve a feeling of the centre of your movements being the same as the centre of your body. If the instrument comes too far to the left, this will result in increased strain in the bow arm, especially when playing on the G or C strings.
The more the violin moves to the left, the more you have to follow with the bow arm in order to play and for the centre of activity to be the same as the body’s centre. This results in increased strain on one side of the body. If you play with the instrument in a more horizontal manner, this results in the bow arm having to reach up higher in comparison to when you play with an angle greater than 45 degrees, which could result in you having to raise your left shoulder joint slightly.
Placement of the left hand
For good hand position, begin by placing the little finger and then the other fingers, as the tension in the small muscles of the hand will then be less. See illustrations 3.1.4–5. Otherwise, small pains can arise in these muscles, which can be felt all the way up at the muscular attachment in the elbow.
The left wrist will stay healthy if it can regularly return to a relaxed position, i.e. to lessen the inward rotation and bending of the wrist. Let the elbow hang naturally free. The arm must be able to move freely beneath the instrument. When playing in the first to third positions on low strings, the elbow should also move forwards, and when playing on the higher strings, it should move backwards. This produces a movement in the left shoulder joint that stimulates circulation in the left shoulder. Moving actively upwards and downwards with the instrument can also help make leaps between high and low positions easier.
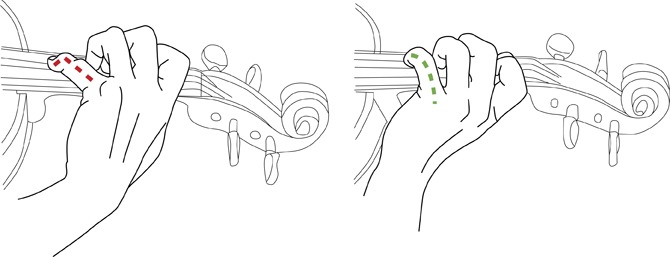
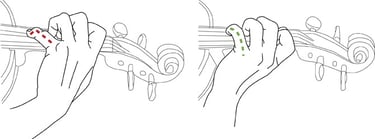
Illustration 3.1.4. When beginning with the first finger on the fingerboard and maintaining the hand position, tension increases in the bent wrist and in the muscles in the back of the hand.
Illustration 3.1.5. When playing with the fourth finger, the tension in the hand will be much less if the position is the same as when using the position of the little finger as the starting point.
The bow
Observe how much power you use to hold the bow with the thumb, index finger and middle finger. It is the power in this grip that is crucial regarding pain in the thumb and the arm in general. Try to see how loosely you can hold the bow and still maintain control.
Begin with an exercise without the bow. Stand at ease on the floor with feet a comfortable distance apart from each other (under the hips). Try a movement with the bow arm; move the arm forwards and backwards in a straight line. Then try to make movements in circles, ellipses and figures of eight, etc. with the feeling that the movement comes from the elbow. What does it feel like in your body, and how is your breathing?
The thumb should not be in an overstretched position in its middle joint, as then the thumb muscle will become overstrained and the thumb’s joints will lock. Check out the video about exercises for hand and thumb.

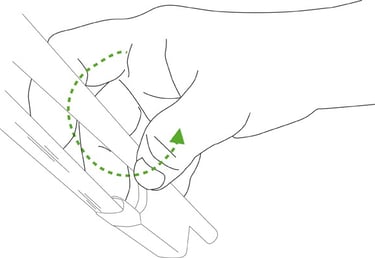
Illustration 3.1.6. Aim for relaxation in the thumb/index finger grip with a bend in the thumb’s joints.
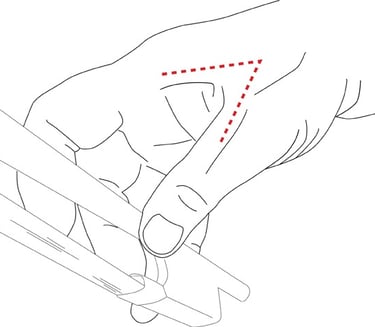
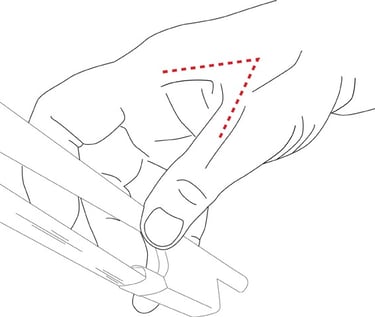
Illustration 3.1.7: This places strain on the thumb-knuckle joint, which becomes more locked and tense.
3.2 Cello Ergonomics
Sitting position with and without instrument
Find a stable position for the upper body and the shoulders, so that the arms and hands are free. Begin with video sitting stability to find a stable position for the upper body. The power you need to achieve good tone quality in the instrument depends on the position of your body and the position of the instrument in relation to the body’s centre of weight. Next, find a good position for the left hand, considering the effect it has on the shoulder musculature and the other muscles in the neck and back.
Try different positions for the hand in relation to the cervical spine and shoulders. Place the instrument where it feels most comfortable – the same position as when sitting without the instrument. Compare also with double bass positioning.
Now take the instrument and try to let the upper body follow along with the arm and hand movements that result from the hand and fingers moving to different places on the fingerboard.
Then, when moving fingers over the fingerboard, let string-change movements flow smoothly over the fingerboard and let the body follow along with these movements, which can be felt all the way from down in the pelvis. When you reach up into the higher positions, let the body follow along with a little bend forward from the hip region.
The bow
Observe how much power you use to hold the bow with the thumb, index finger and middle finger. It is the power in this grip that is crucial regarding pain in the thumb and the arm in general. Try to see how loosely you can hold the bow and still maintain control.
Begin with an exercise without the bow. Stand at ease on the floor with feet a comfortable distance apart from each other (under the hips). Try a movement with the bow arm; move the arm forwards and backwards in a straight line. Then try to make movements in circles, ellipses and figures of eight, etc. with the feeling that the movement comes from the elbow. What does it feel like in your body, and how is your breathing?
The thumb should not be in an overstretched position in its middle joint, as then the thumb muscle will become overstrained and the thumb’s joints will lock.

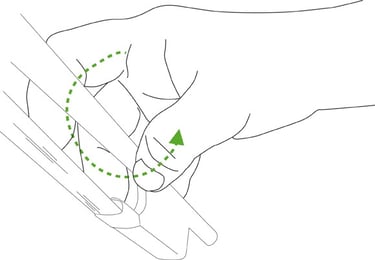
Illustration 3.2.3: Aim for relaxation in the thumb/index finger grip with a bend in the thumb’s joints.


Illustration 3.2.3: Aim for relaxation in the thumb/index finger grip with a bend in the thumb’s joints.
Hand position
The grip reflex in the hand is always present with increased activity in the thumb when the fingers are active. This can lead to unnecessary tension in the hand and in the musculature of the arm. The left thumb should ideally be inactive, instead forming an important and flexible support.
If you have a short little finger, there will be less strain on the musculature if you distribute the weight more effectively when the left little finger plays. The opposite also applies when you play with the index finger, when the weight of the hand flows through the finger and the pad of the finger. If you play with overstretched fingers they are more likely to lock.
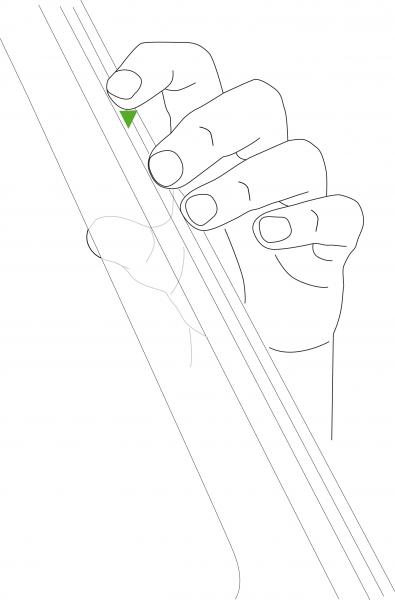
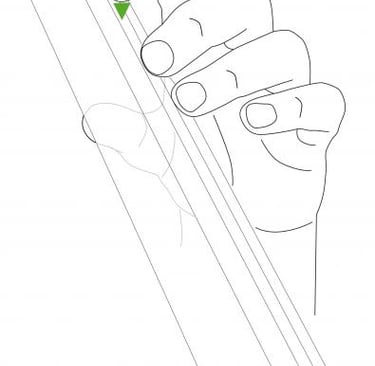
Illustration 3.2.2-3: The weight is now on the index finger, and the forearm is turned a little inwards.
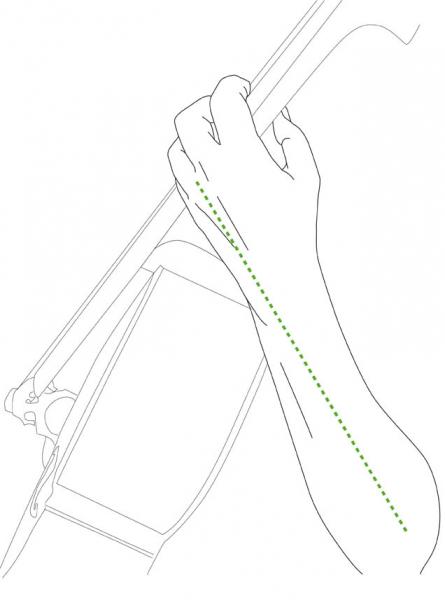
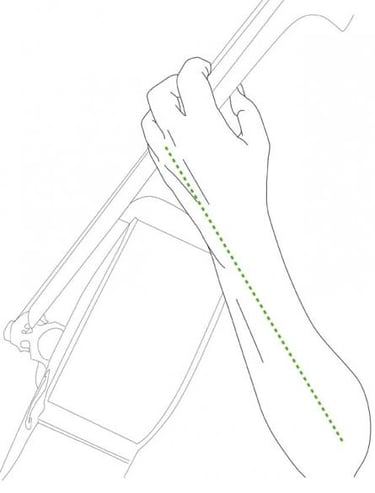
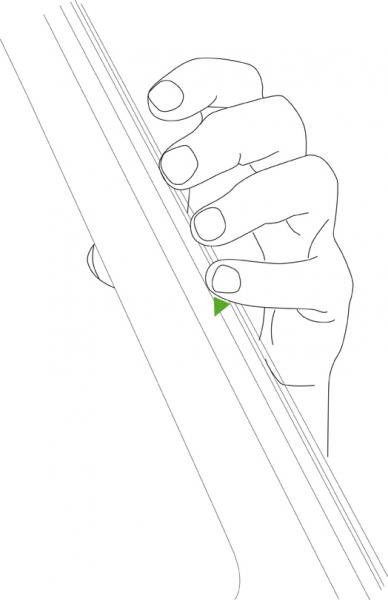

Illustration 3.2.4-5: The weight has now moved to the little finger and the forearm is turned slightly outwards.
The position of the fingers is also crucial for speed and precision. Try to put your hand on the fingerboard with all the joints of the thumb stretched, and feel the freedom of motion in the fingers compared to when the thumb’s joints are slightly bent. If you want to train your hand and fingers we recommend hand exercises - video.

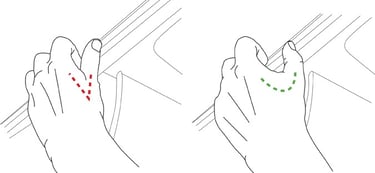
Illustration 3.2.6: All of the thumb’s joints are stretched and locked in this position.
Illustration 3.2.7. The position of the hand becomes more stable and free in the joints, and the knuckles can be seen more clearly.
Try to distribute the weight from the shoulders down through the arm and to the pad of the finger; feel how this forms an interconnected chain without requiring you to press or squeeze the fingers against the fingerboard.

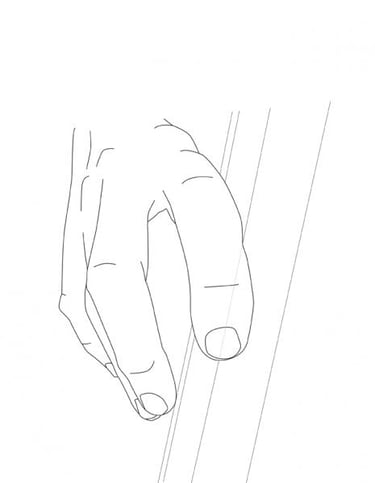
Illustration 3.3.11: The finger touches the string between the outer joint and the pad of the finger.
The power in the stroke is directed in towards your own body and the finger slides off the string during the movement.
If you play with overstretched fingers, your fingers are more likely to lock.
When playing in thumb position, tension will lessen if the outer joint of the thumb is slightly bent. If you want tips on how to train the stability of your hands go on to hand exercises - video.
Try to distribute the weight from the shoulders down through the arm and to the pad of the finger; feel how this forms an interconnected chain without requiring you to press or squeeze the fingers against the fingerboard. Finally, breathe as you play so that the muscles in your body can vary their levels of tension.
Pizzicato technique with the right hand
The thumb acts as the point of support on the fingerboard, and the impulses for movement come from the arm and shoulder to lessen strain on the fingers. The thumb should be placed on the fingerboard so that the hand continues to be in a straight line with the forearm, and so that the wrist is not subjected to extra strain. The string should be placed somewhere between the first joint and the pad of the finger, at the same level as the cuticle.
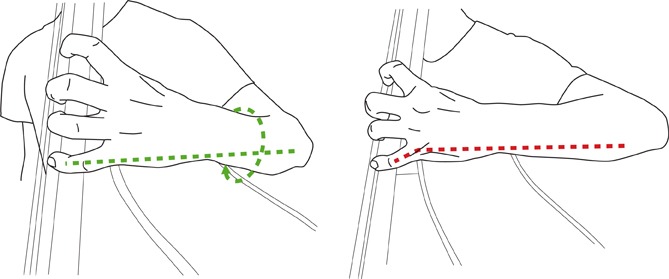
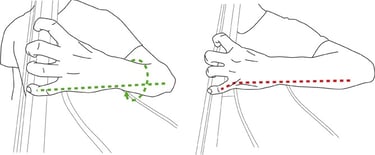
Illustration 3.3.7: The forearm is rotated slightly outwards for the weight to be transferred to the little finger and thus decrease tension in the hand.
Illustration 3.3.8. Here there is increased tension in the little finger, which almost has to twist its outer joint.
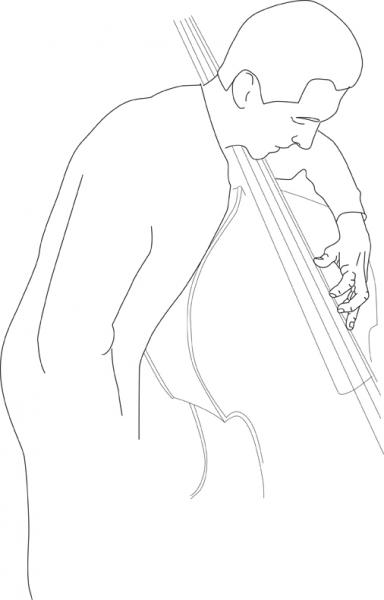

Illustration 3.3.6: When leaning forwards from the hip, there is no strain on the shoulder joint itself.
A left-hand grip with larger distance between the fourth and fifth fingers increases strain on the musculature of the forearm, especially on the outer side.
When using the “hanging” technique in the left hand, there can be an increased bending of the wrist, which can lead to strain on the disc in the wrist; quite simply, it becomes pinched. To avoid this, the elbow should be lifted slightly outwards, and in this way the distribution of weight to the fingers can also function better.
If you have a short little finger, there will be less strain on the musculature if you distribute the weight more effectively when the left little finger plays.
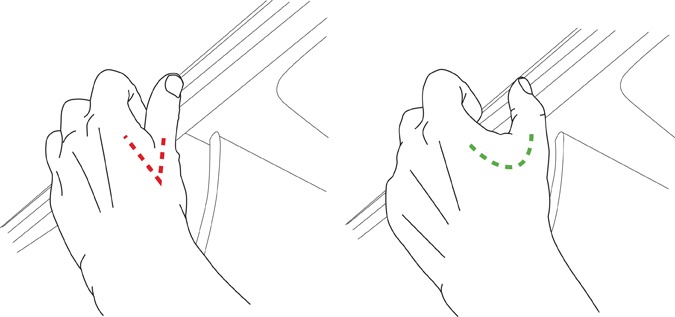
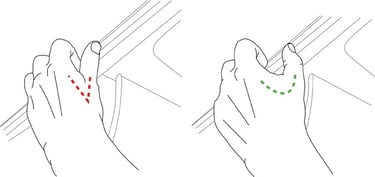
Illustration 3.3.9: The position of the fingers becomes more locked as the joints of the thumb are stretched.
Illustration 3.3.10. When the joints of the thumb are bent and relaxed, the hand’s position is more stable and free, and the knuckles appear more clearly.
In thumb position you should lean the upper body forwards so that the upper body is kept stable and the arm will be able to reach. Imagine an axis of movement through the hip joints. Try to lean slightly forwards.
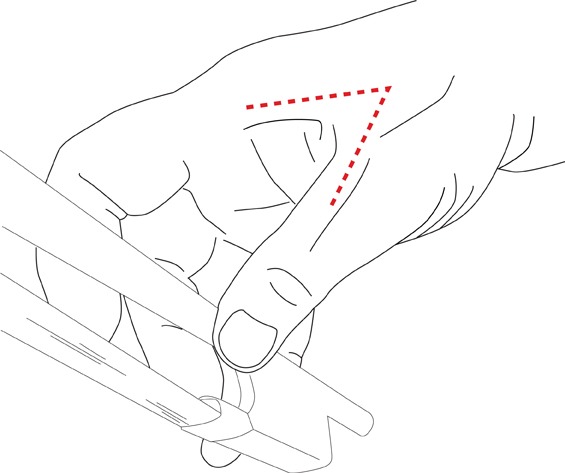
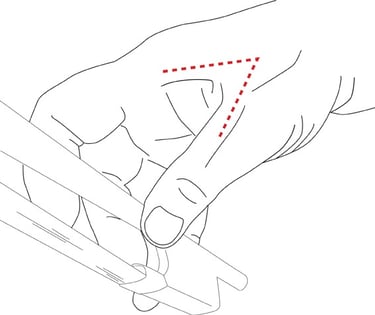
Illustration 3.3.4-5: Aim for a relaxed grip in the thumb and index finger with a bend in the joints of the thumb to minimise strain.
Hand position
The left thumb should be flexible without requiring you to press or squeeze it against the fingerboard. The grip reflex in the hand is always present with increased activity in the thumb when the fingers are active. This can lead to unnecessary tension in the hand and in the musculature of the arm. Make sure the muscle between the thumb and index finger maintains a low level of activity.
The bow
Exercise wih and without the bow
In the thumb/finger grip, it is important to use as little power as possible. The thumb should not be in an overstretched position in its middle joint, as then the thumb muscle will become overstrained, the thumb’s joints will lock, and the movements of the fingers will be inhibited.

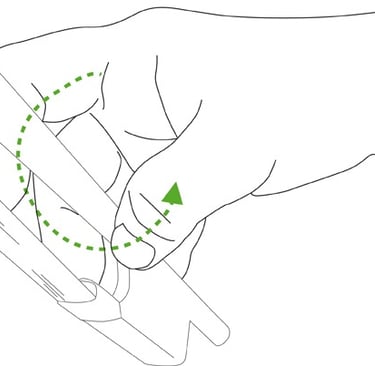
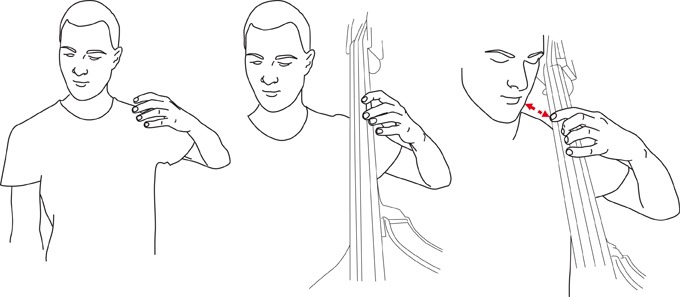

Illustration 3.3.1. Begin by holding your arm/hand in a comfortable position from the cervical spine and shoulder.
Illustration 3.3.2. Now take the instrument to the same position that previously felt comfortable without the instrument.
Illustration 3.3.3. The wrist becomes tense from being bent inwards; this can be avoided by changing the angle of the fingerboard or moving the elbow outwards. Here the fingerboard is placed considerably closer to the cervical spine than in Illustration 3.3.2.
For sitting position, go to video sitting stability and try to find a stable position while seated with both feet on the floor or on the chair’s footrest, but without using the backrest, in order to achieve greater freedom. Place the instrument at an angle so you can minimise the backward stretching of the left arm to get to first position.
The angle/rotation of the instrument depends on how well the bow functions on the highest and lowest strings. Try different angles and feel what happens in the shoulders and neck. You can also change the angle when you need to get to the lowest string.
3.3 Double Bass Ergonomics
Body position with and without instrument
Try the video standing stability to find a stable standing position in which there is freedom to shift the weight from one leg to the other, and with a feeling of “oil” in the joints, i.e. stable but not completely locked, which can occur when you stand with overstretched knees. Support the instrument on your left side, placing it close to the edge of the pelvis.
Exercise to examine the placement of the left hand
It is now time for an exercise for the placement of the left hand and the instrument considering the effect it has on the shoulder musculature and in the other muscles in the neck and back. Notice how your shoulder feels and also your breathing.
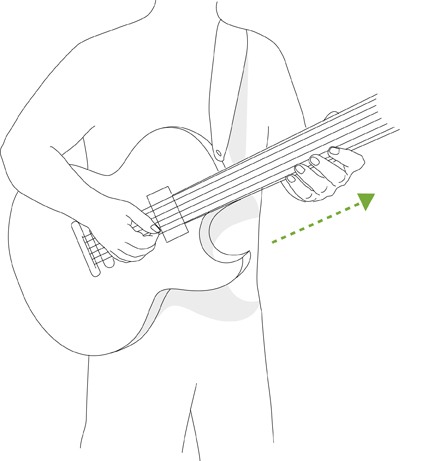
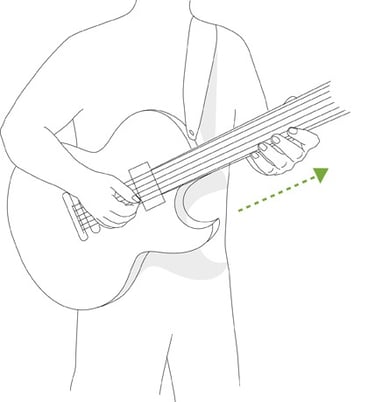
Illustration 3.4.2: In this position, the wrist finds itself in an extreme inward bend, which functions only if it is used for shorter periods. The exception to this rule is the barré grip, in which a straight finger is required for string contact. Be aware of your breathing, as this offers a good measure of how relaxed your torso is while playing. To achieve this, you need to be able to find an upright position without using a back support.
Do you want exercises for hand and fingers check out the video hand exercises and for guitar ergonomics look at this video: guitar play.
Electric guitar/bass guitar
When playing electric guitar or bass guitar, try to place the guitar horizontally and more diagonally out from the body. Alternatively, you can play standing up, as this makes it easier to direct the fingerboard diagonally upwards.
Illustration 3.4.1 Make sure that the grip between the thumb and fingers is relaxed. The thumb’s function is to support the hand. Notice how tense the muscle is around the base of the thumb. There should be some space around the fingers and palm when the fingers are placed on the fingerboard.

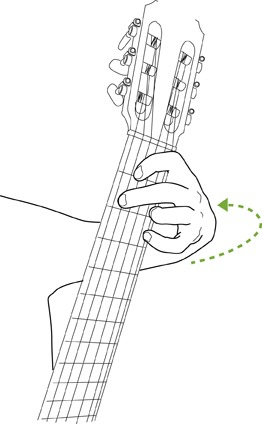
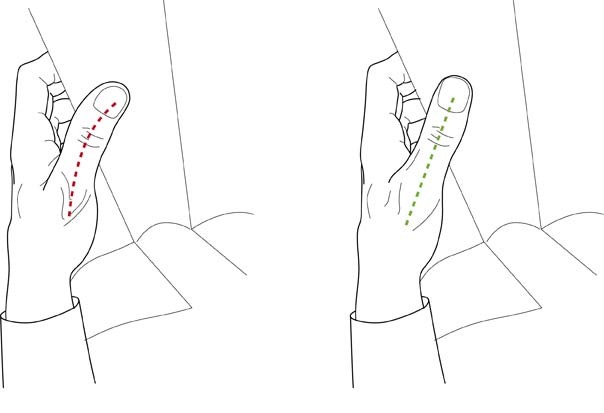

Body position with and without instrument
Go to video sitting stability to find a stable sitting position before taking your instrument. Sitting is demanding for the back, as we can only bend the hip joint up to 60 degrees; the rest of the curvature when sitting occurs in the lumbar spine/pelvis, which then becomes more rounded, making it more difficult for the pelvis to support the vertebral column in an upright position.
The goal is to keep the pelvis and lumbar spine in an upright position as well as avoiding unequal strain on the back and pelvis muscles, such as when using a supporting footstool under the left foot. When you use such a support, which entails the left foot being positioned higher than the right, the result is an imbalance of strain in the back. As you take the instrument, try to sit in front of a mirror, in order to see how you can avoid asymmetry with differently positioned shoulders, which can cause pain in the musculature of the shoulders and also in the shoulder joint itself if the weight becomes uneven for a long time.
When you go through the sitting exercise, notice what happens in the body and especially how the musculature feels around the pelvis/lumbar spine and up around the shoulders. The goal is to find stability in the various positions without locking the small joints, so that you can concentrate on the peripheral muscles and their important fine motor ability.
As you carry out these exercises be aware of your breathing, as it will let you know how relaxed you are.
Position of the instrument and hands
Your posture also affects the degree of inward bending of the left hand. The basic placement of the guitar affects the position of both left and right wrists.
Try to position the fingerboard more diagonally. Then try to find a position where the right hand will not constantly angle outwards from the wrist. When the right forearm rests against the edge of the guitar, this can press against the nerve that lies close to the crook of the arm. Try to find a position with the least possible pressure. When actually playing the instrument, try to direct the power of the fingers of the right hand in a 90-degree angle against the direction of the string. The touch on the string itself should be made between the nail and the edge of the pad of the finger.
Left hand: Try for a low level of activity in the left thumb, which should support the movements. Try to avoid pressing with the fingers and squeezing the thumb around the fingerboard. How we place and use the fingers on the fingerboard has consequences for how much strain is placed on the whole arm and shoulder. The hand and fingers function optimally when the pads of the fingers make contact with the strings so that the fingers have a slight curvature in all joints.
3.4 Guitar Ergonomics
Illustration 3.4.3. In this position, with the guitar and fingerboard directed out from the body, both the left and right wrists find themselves in favourable positions. In this way you will largely avoid bending the left wrist while playing. Make sure that the guitar comes as far down as possible to the level of the pelvis, and that the right hand bends inwards as little as possible. Try to keep the right wrist straight.
The position of the thumb while playing
The thumbs have different positions as the hands are moved over the keys out towards the sides, where the thumb must come underneath, i.e. be carefully prepared beneath the hand until it is needed. When playing in the centre of the keyboard, prepare the fingers instead by placing them over the thumb.
Float with the hand when using all five fingers; the elbow will make elliptical movements. The centre of balance will move when the fourth and fifth fingers are playing. Make sure your thumb is relaxed when playing with the other fingers.
Feel free to look further and be inspired by these videos: Piano practising.
Keystroke
Starting point for playing with the fingers: prepare the finger for playing the keys by letting it be close to the key, and do not lift by bending much in the finger joints. When you lift the finger, try to stretch the finger slightly without too much activity, and then release and play.

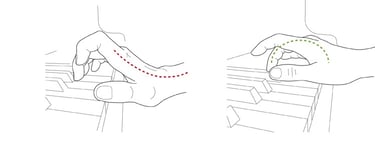
Illustration 3.5.8. Now the rotation in the shoulder is complete. The forearm then follows, and the hand will be ready to play on the keys. Muscle tension in the forearm lessens considerably.

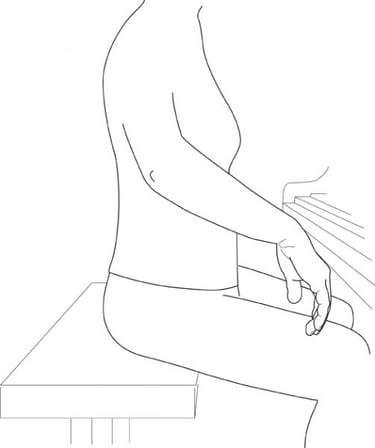

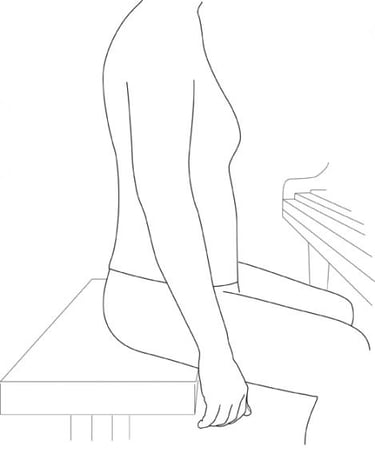
Illustration 3.5.7. The arm hangs in a relaxed manner by the side. Then point the thumb forwards and the palm in towards the side of the body.
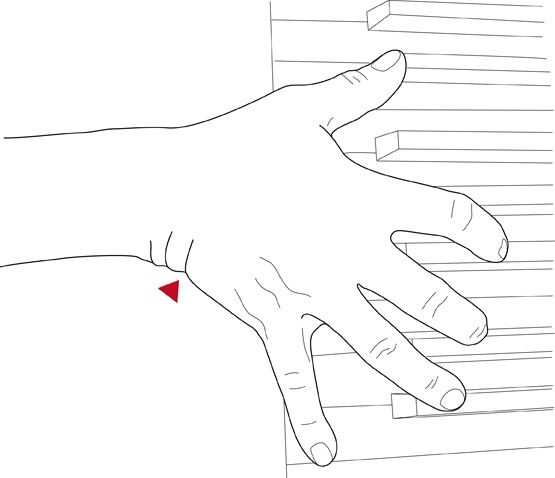
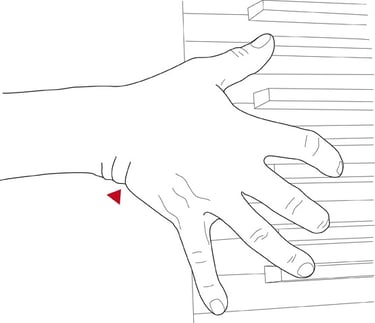
Illustration 3.5.5. For large hand positions, the wrist can easily find itself twisting slightly outwards.
It is important to be able to let go of this hand position as quickly as possible. (This twisting to the side can otherwise become a cause of pain in the musculature all the way up to the muscular attachments at the elbow on the side of the little finger).
Controlling motor activity in the hand and arm
Lift the arms, imagining a thread on the outside at the level of your elbows. Let the elbows be at the same level as the white keys. Then release the hand and fingers down to the keys. When you prepare to place the hands on the keys, try to twist inwards with the shoulder muscles (necessary for the fingers to reach the same plane as the keys) and not with the forearm. Begin by letting the arm and hand hang beside your body. Before you place the hands on the keys, rotate the shoulders inwards. The hands will then be ready to be placed on the keys.
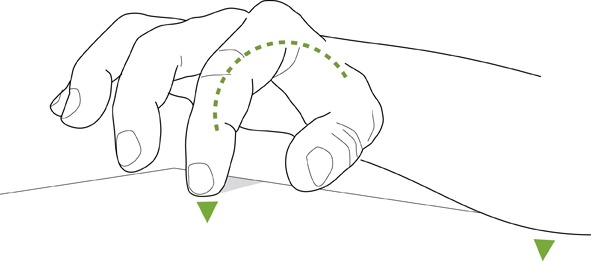
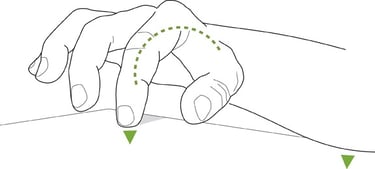
Illustration 3.5.4. Sit at a table and let the forearm rest stably on the table. Let the weight of the whole hand rest on the finger, which should be in a stable position with a slight bend in all its joints. Try to pull the whole hand/arm backwards with this feeling.
The wrists need to be elastic and flexible when playing piano. Imagine a movement where the arm, wrist and fingers move forwards and upwards when playing. The energy comes from the keys and gives a light, springy forward/upward motion. If the wrists lock, this results in increased tension in the forearm muscles. Make sure the wrists do not find themselves below the level of the keyboard.
Position of the hand
Avoid maintaining a position while playing in which the hand twists to the side, towards the outer side of the hand.
Illustration 3.5.3. The back of the hand should be rounded; on the inside, the little finger and thumb stretch out the back of the hand and stabilise the knuckles.
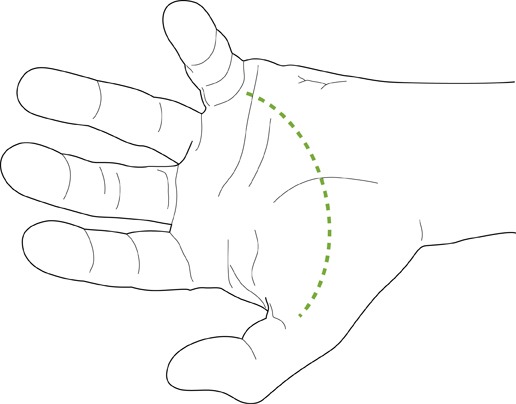

Lay the hand on the table with the back of the hand facing upwards, and let the forearm rest on the surface of the table. Tense the hand by stretching out the fingers so it becomes very broad with a considerable distance between the knuckles. Now bend all the knuckle joints slightly. Then bend the knuckle joint of the thumb a little extra in comparison to the fingers, and also the little finger, in which the actual bend occurs in the finger knuckle. Let the second and fourth fingers be a little more relaxed in this position. Feel how you stretch and made the whole hand broader by stretching diagonally between the little finger and the thumb so that the fingers are spread well apart. Maintain this position for a few seconds and then relax. Repeat this exercise 5–15 times and look at the back of hand to notice how the knuckles can be seen clearly.
Function of the hand
Train the contact, stability and distribution of weight to the fingers on the keys by “standing” on the pads of the fingers and slowly pulling the fingers towards you. This can also easily be practised without keys on a table, for example. Lay your hand on the table in a position of rest. See Illustration 3.5.4.
The hand
Appearance of the hand
Examine the grip strength of the hand: Rest your forearm on the table and look at your hand. Find a position in your hand where your knuckles are visible and it feels as if you are hiding a bird, ball, etc. Start from the stability in your hand around your third finger.


Illustration 3.5.2: The hand at rest with longitudinal and transverse arches in the optimal starting positions for hand function.
To achieve a stable position in the knuckles, in which they can be seen clearly, do the “cup” exercise. See hand exercises video.
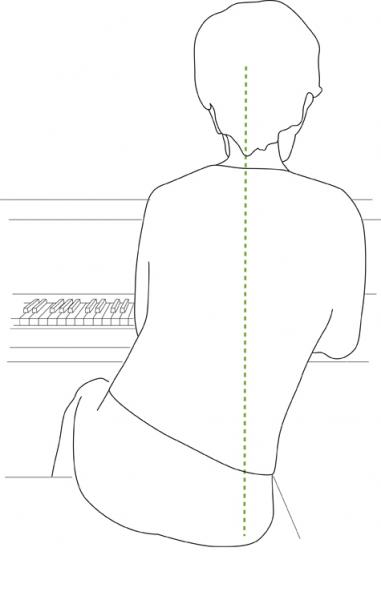
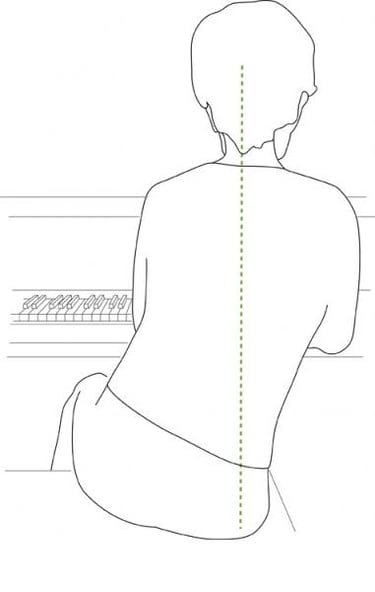
Illustration 3.5.1: The centre of balance shifts to the right ischium and the torso maintains its upright position.
As you move down to the lower octaves, the weight shifts to the left ischium and vice versa when you play in the higher octaves. Let your breathing flow freely in relation to the musical phrase. Do not hold your breath as you play.
3.5 Piano Ergonomics
Position of the body
Begin with exercises regarding how to find a dynamic and stable sitting position. Video sitting stability
The sitting position must be stable without feeling too much strain in the torso and back. You should not need to feel the musculature in the torso working hard. Instead, the position of the pelvis is crucial for you to be able to relax when seated. Find a sitting position in which you can sit on the ischia (the curved bones at the base of the pelvis), so it is possible to maintain flexibility around the hip joints, and so you can bend forwards at different angles in order to vary your position in relation to the keyboard.
Try to find a suitable height at which to sit so that the elbows are at the same level as the keys. When you have found the optimal sitting position, the distribution of weight to the fingers through the arms will be more effective. Feel how the distribution of weight begins from all the way down in the soles of the feet and flows through the pelvis and its contact with the seat base and out to the pads of the fingers on the keys. Do not lock your feet and legs when seated. At the piano, the heel of the pedal foot should rest on the floor.
The goal is to use the least possible power and effort when playing, even during dramatic moments in the music. As you move over the keyboard, try to do so with a feeling of a “brushstroke” in the body. If you make this “brushstroke” in the upper octaves, try to feel the shifting of weight from seating level, as in the following illustration.
Illustration 3.5.9. Lifting the index finger with greater curvature in its outer joints and stretching the knuckle joint more increases the tension and locking in the joints of the finger.
Illustration 3.5.10. Release the bend in all the finger’s joints slightly. You will then have more energy for the keystroke and will more easily be able to use the weight of the finger. Use rounded fingers for playing, as this will entail less tension in the extensor and flexor muscles. You should be able to see the knuckles while playing. If your little finger is very short, let the arm follow along as you play, and assist with a slight rotation in the forearm for better weight distribution to the little finger.
Look at the position of the wrists. In particular, notice how the fourth and fifth fingers of the left hand function. If your fingers are short, an adaptation of the relevant keys may be required.
Make sure the right wrist finds itself in a comfortable position, such as when you lay your hand/forearm on a table in a relaxed way.
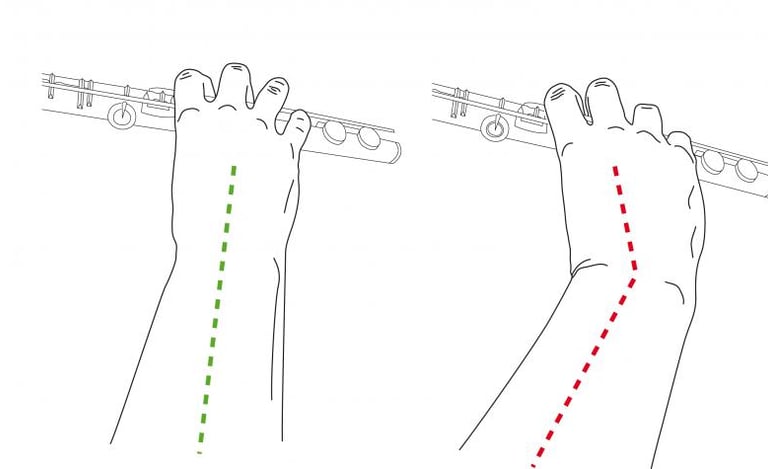
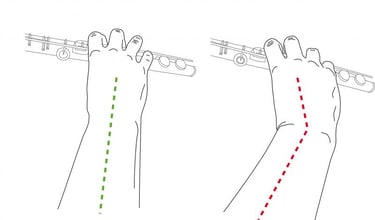
Illustration 3.6.4. Left illustration. Relaxation in the wrist without angling to the side.
Illustration 3.6.5. Right illustration. When the last joint of the flute finds itself in a position with its keys rotated too far back, the result is a more pronounced twisting of the wrist. Occasionally it is necessary to turn the right-hand keys anticlockwise to achieve this.
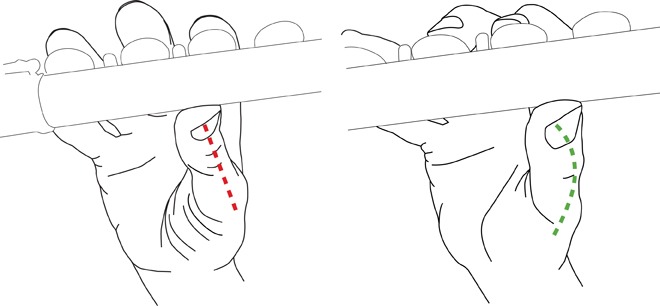
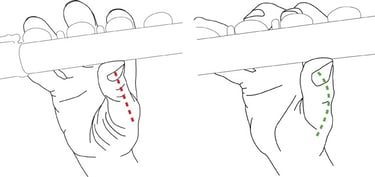
Illustration 3.6.2. Left illustration. When the thumb’s joints are overstretched, the muscles will need to work considerably more, as well as the thumb joints becoming more compressed and tense.
Illustration 3.6.3. Right illustration. The thumb placed closer to the index finger with relaxed joints in the thumb. The thumb should be placed closer to the hand, somewhere between the index and middle fingers. Try to have the thumb in a relaxed position without overstretched joints.
To find a relaxed and stable base for both standing and sitting positions, go to video Standing stability and video sitting stability. In standing position, you can avoid twisting the thoracic spine if you place the left foot in front of the right, and thus achieve a rotation from down in the hips and pelvis. In sitting position, try also to rotate from down in the pelvis. The most important thing is for the shoulders and shoulder blades to be symmetrical. You can also get tips on flute playing in this video.
Change between a horizontal position with the flute, and a position with curvature in the neck to the side; the horizontal position is more demanding for the shoulders, whereas the diagonal position is more of a strain on the neck with its curvature to the side. It is good to be able to vary these positions so that the muscles can recover.
Look in the mirror without unduly straining the neck by moving the chin forwards. If you are sitting in front of the music stand in an orchestra, where you should maintain good contact with the conductor, rotate your chair so that both the seat itself and your view will comfortably allow you to move between the music and the conductor, with both in the same line of sight.
Try to hold the instrument up with a feeling of the weight being distributed equally in both hands. Try to find balance when holding the instrument, so that the flute finds supporting points on the left index finger’s inner knuckle, the right thumb and against the lips.
The contact with the lower lip is the third point of support when holding up the instrument. Notice how the contact feels between the flute’s mouthpiece and the lips. If the pressure becomes too strong against the lips, this can result in increased tension in the neck muscles to press against it.
Bring the instrument down as often as possible in order to return to a position of rest in the cervical spine. The right thumb is placed comfortably in a position somewhere close to the index finger. Hand exercises video
3.6 Flute Ergonomics


Illustration 3.7.4. By turning the mouthpiece, the conditions in the mouth become considerably more relaxed.
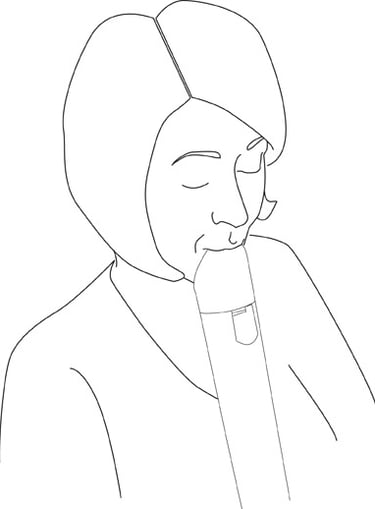

Illustration 3.7.3. This mouthpiece causes the lips and mouth to become very tense.
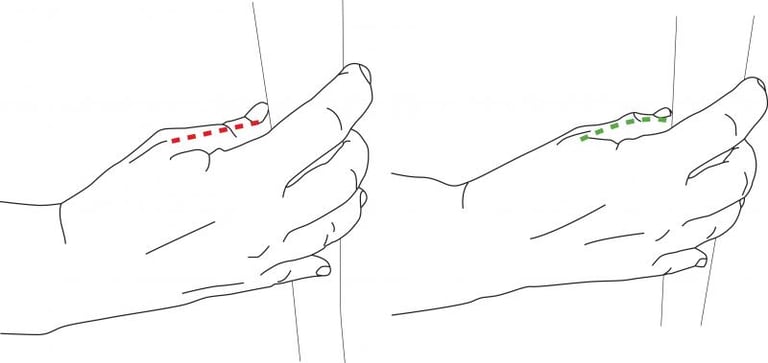
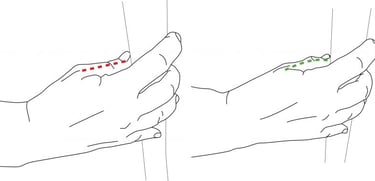
Illustration 3.7.1. If the joints of the thumb are overstretched, the thumb will be more tense and locked in its middle joint, and this affects the tension in the wrist.
With larger instruments, such as the bass and great bass recorders, supporting the weight on a spike or a rest on the floor will ease the strain considerably. If you support the weight when seated by resting the instrument on your feet, the torso will more easily sink inwards and your breathing capacity will decrease.
The significance of the mouthpiece becomes clear with bass recorders, as the position of the mouth becomes more relaxed when you turn the mouthpiece.
3.7 Recorder Ergonomics
The variety of instrument sizes in the recorder family results in different weights and strains. It is mainly the right hand and the contact with the lips that stabilise the instrument. The placement of the right thumb on the rear of the instrument is crucial for the strain on the right hand/arm/shoulder. For the thumb to be in a position directly opposite the index finger usually decreases tension in the hand and wrist. If the thumb is overstretched in its joints while playing, muscle tension will also increase around the base of the thumb and around that area of the wrist. If you want to strengthen your hand and thumb, you can watch hand exercises video.
Bass clarinet
Regarding the bass clarinet, it is important for the neck of the instrument to be adapted to the player’s own torso and neck dimensions.
The left hand should move flexibly around the various keys. The optimal placement of the thumb of the right hand is under the thumb rest in order to avoid overstraining, i.e. take the weight as far in on the thumb as possible. It is also good for the right hand to be able to use a support on the floor or around the neck.
Clarinet and Oboe
For reed instruments, the quality of the reed itself is highly significant in terms of the strain placed on lip muscles and other muscles in the cheeks and back, as well as the muscles of the rest of the body. A reed that demands a great deal of pressure can, as such, generate an increase in muscle tension throughout the body.
If the right thumb is weighed down on its outer edge, then it may be advisable to adjust the thumb rest, so that more of the weight can be taken by the hand, thus causing less strain on the muscles.
Another option is to relieve strain with a broad, non-restrictive strap around the neck.
The angle between the body and the instrument can affect the position of the neck, with one extreme being if the instrument is played with the head pressed forwards, and the other when the head is angled somewhat downwards.
To create good standing and sitting positions that can relieve strain on the shoulders and arms, we recommend watching the videos on this topic, video standing stability and video sitting stability. The stability and position of the hand are also important in preventing strain problems: hand exercises - video.
3.8 Clarinet and Oboe Ergonomics
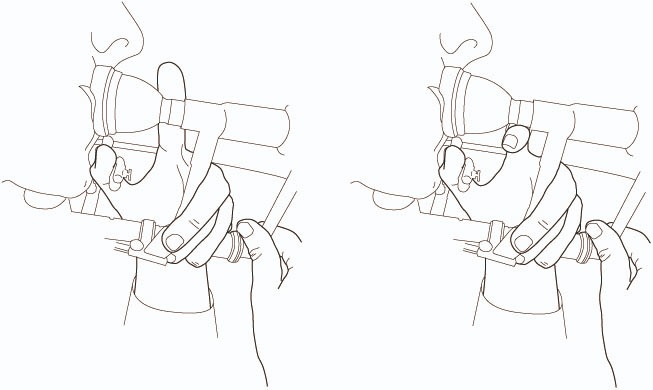
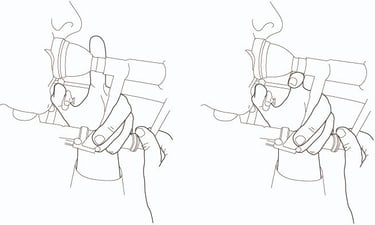
Illustrations 3.9.1–2. To hold the instrument is demanding for the whole hand/arm. This can be alleviated by changing the little hook so that the index finger attains a more natural position.
Balance in the instrument is crucial for the strain placed on the hand and up in the shoulder. If the instrument is heavy at the front, the strain will increase on the hand/arm/shoulder more than if it is heavier at the back. When the instrument is brought to the lips and the right hand holds the slide, try to attain a feeling of symmetry in the position of the arms.
There is a Finnish trombone stick available that helps to reduce the strain of the weight of the instrument.
Here you find videos about standing stability and sitting stability and hand exercises.
3.9 Trombone Ergonomics
The instrument is held by the left hand and balanced by an area on the inside of the palm on the metacarpal bones. It is important for the angle between the hand and forearm to be such that the weight can be conveyed to the arm and further into the rest of the body, and that the wrist finds itself in a neutral position. The left hand also needs to stabilise the instrument’s tendency to rotate. In order to avoid overstraining the left arm and shoulder, it is important to not hold the instrument with an outstretched hand position and overstretching the outer joint of the index finger.
Try to relax the right arm/hand and then place the hand on the instrument. Make sure the elbow is held slightly outwards, so there will be a feeling of symmetry and your breathing movements are not disturbed by the position of the arms.
The angle of the instrument compared to the body affects the neck, and if you cannot find the optimal position, this also affects your ability to breathe freely.

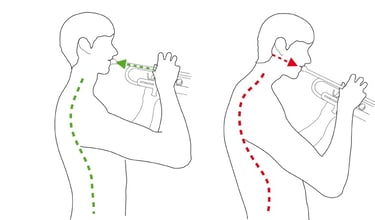
Illustration 3.10.3. When the chin is pulled inwards and there is a feeling of lifting the head from behind, the cervical spine is straightened up to a more relaxed position.
Illustration 3.10.4. When you adopt a position with a tendency towards “vulture neck”, i.e. curving the neck in an S-shape, the disks in the cervical spine are pressed together more, and the strain on the stabilising musculature, such as that which raises the shoulders, increases.
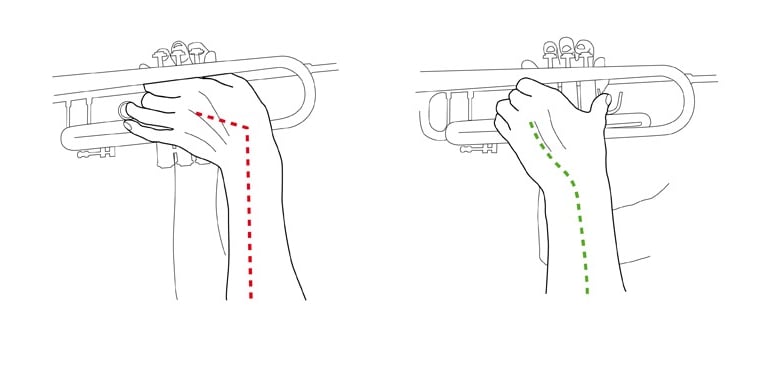
Illustration 3.10.1. Bending the wrist to the side creates a considerable increase in tension in both the wrist and the muscles of the forearm.
Illustration 3.10.2. Repositioning the thumb will result in a more relaxed position for the back of the hand and the wrist.
3.10 Trumpet Ergonomics
The instrument and the body
The first thing is to achieve a relaxed torso, which is important for the breathing and flow of air. All types of exercise to find this are acceptable, everything from moving the arms and legs to stimulate the breathing and heart, to more gentle exercises, such as yoga. The goal is for the diaphragm to function dynamically, with no resistance in the breathing musculature. For more details, see the introduction for wind instruments in Part 3, as well as Chapter 2.
For your breathing to function well you need a stable torso, in which the vertebral column rests securely on the pelvis. To achieve a stable position in the pelvis, try video standing stability and video sitting stability.
The grip with which you hold the instrument is important. All grips that demand an “outstretched” hand easily result in extra tension, first in the hand and forearm, and later even in the upper arm and shoulder. Begin by holding the instrument with the left hand.
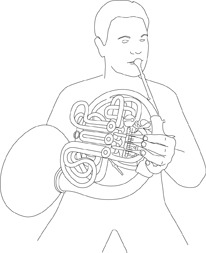
Illustration 3.11.2. Now take the instrument to your lips; you no longer need to rotate the neck in order to keep the body in the same position.
The other on, in order to avoid twisting the head around, begin by holding the arms with a 90-degree bend in the elbows, and feel the torso rotating from all the way down in the pelvis – a little twist to the right, so that the right elbow ends up a little behind the body. The head follows this movement. Now take the instrument to your mouth.
Depending on the size of the instrument, it can occasionally be easier for a beginner to stand with the instrument while playing.
The instrument is held up by both left and right arms. The left hand functions best when you do not stretch between the middle finger and the little finger.
Stable distribution of weight is achieved by a “duck foot”, for example, or another means of assistance, which will place the weight between the thumb and index finger. How you place the thumb on the valves is also important for how the weight is distributed on the hand/arm/shoulder, so that your position of rest is one in which the thumb is relaxed, i.e. with a slight bend in all its joints. The right hand is placed inside the bell, both to affect the sound and also to hold the instrument up. It is also possible to place the weight of the instrument on the right thigh, even if this results in a static position. It is important for the distance up to the lips to be correct so that the neck does not become strained. A leg support or a firm cushion can also offer support.
Here you find videos about hand exercises and standing stability and sitting stability.
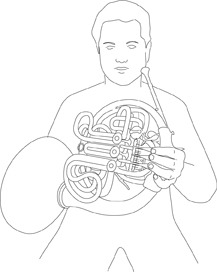

Illustration 3.11.1. Adopt a position where the shoulders are both at the same level and the torso is upright and not rotated.
3.11 French Horn Ergonomics
There are, in general, two basic positions for the French horn:
One is to sit with the shoulders completely symmetrical, without rotating the torso. This requires turning the head to the left in order reach the mouthpiece. In this position, it is possible to support the instrument on the right thigh. Make sure both arms have a little space between them and the torso, so there is room to breathe freely and expand the trunk of the body.
A balance hanger fixed to the middle of the bassoon can lessen the weight considerably.
It is easier to balance the instrument when standing. When sitting, a leather cup can be used to distribute the weight, with the cup itself around the lowest part of the instrument (the boot); a strap extends from this, upon which the player can sit. A spike can also function well as a way to support the weight, although this often results in a negative effect on the musical performance. Most Western bassoonists use a supporting strap around the neck, with varying designs and customisations resulting in varying levels of constriction around the neck and shoulders. Many players find a double shoulder strap to be a more advantageous solution for weight distribution than a single strap around the neck.
In order to avoid problems in the joints of the jaw, try to play with a slight gap between the teeth.
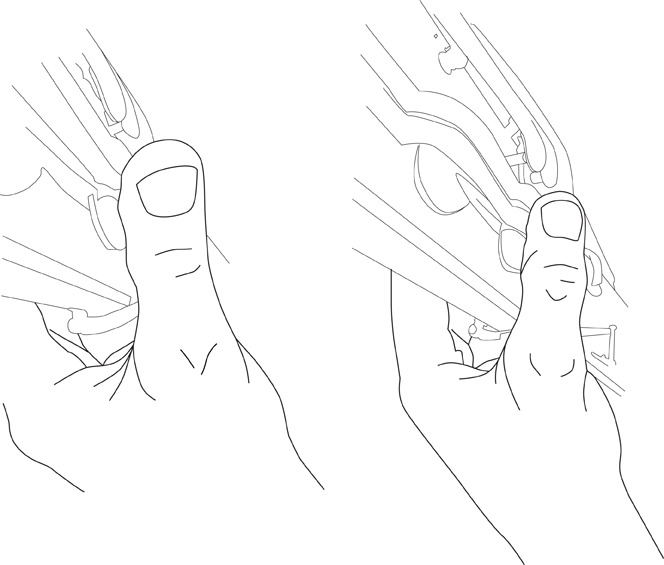
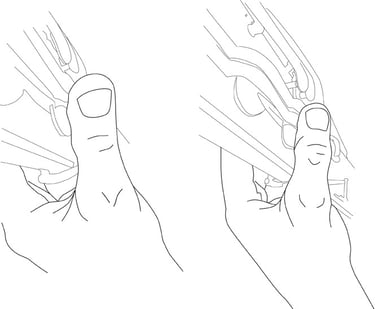
Illustration 3.12.2. The thumb adopts a position in which its middle joint is stretched due to the placement of the keys.
Illustration 3.12.3. The thumb adopts a more comfortable bend in its middle joint.

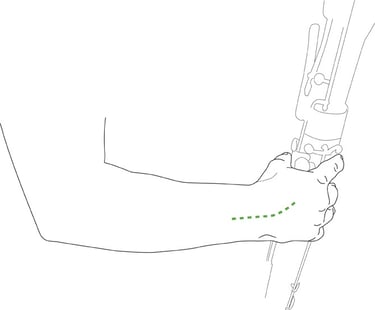
Illustration 3.12.1. The right wrist adopts a neutral position, and bending is avoided by holding out the elbow.
Try to maintain a feeling of holding a round object like an orange in the hand to attain a good hand position.
To avoid considerable bending in the wrist, hold the elbow slightly outwards without it becoming tense. The left hand also grips around the instrument, resulting in strain on this hand.
The right thumb has several different positions to handle the different keys, which can involve increased strain on the joints in the thumb. See the following illustrations, in which a basic position of rest is created with the thumb adopting a slight curve in its joints. You will find exercises to strengthen the hand and thumb here hand exercises.
3.12 Bassoon Ergonomics
For reed instruments, the quality of the reed itself is highly significant in terms of the strain placed on lip muscles and other muscles in the cheeks and back, as well as the muscles for breathing and others in the rest of the body.
The bassoon is an instrument that weighs down both the right and left hands. It also has an adjustable support for the right hand.
Cymbals
These are often heavy, and to successfully distribute the weight, position the centre of balance in the very centre of your body.
Marimba, xylophone and vibraphone
These instruments require great flexibility in the body’s centre of balance while playing. To begin with, find a posture with a stable torso (see video standing stability) and a feeling of being able to sit without actually sitting. This results in flexible hip joints and knee joints, allowing lateral movement without having to move the feet. All this should also take place with a feeling of leaning slightly forwards from all the way down in the hip joints.
Illustration 3.13.3. Relaxed wrist, and relaxed around the timpani stick itself inside the hand.
Illustration 3.13.4. The elbow leads the hand with the timpani stick upwards.
Illustration 3.13.5. The wrist is now stretched and has pulled the timpani stick upwards, ready to be directed downwards again and released onto the timpani skin.
Tuning the timpani skin is controlled by the pedals, and demands a flexible position and good balance in the torso in order to minimise exhaustion and tension in the calves and thighs.

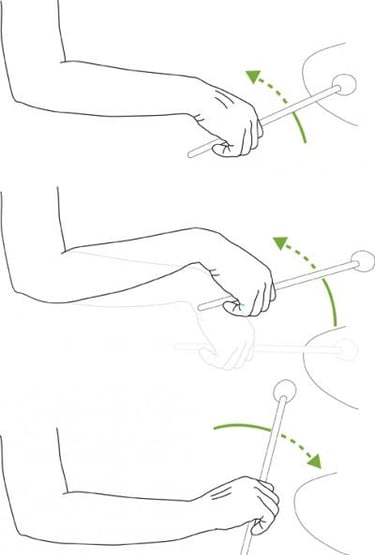
Timpani
Timpani sticks are held in a similar way to other drumsticks, but with more lightness towards the end of hits so that the timpani skin can ring.
Try to allow the first beat of four to start with an impulse in the elbow, with the rest coming from the wrist, to counteract overstraining of the musculature in the wrist and forearm.
When playing with the pedal on the bass drum, you can either have the weight on the heel, which places greater strain on the front muscles of the lower leg, or have the front of the foot in contact with the pedal, in which position most of the movement comes from the thigh muscles.
Illustration 3.13.2. The angle in the elbow should be 90 degrees or greater. The arm should feel as though it can rest in this position, so that it does not require extra exertion to hold up the forearm and hand.


Illustration 3.13.1. The grip around the drumstick, with contact between the inner sides of the index finger and the thumb.
The forearm is twisted a few degrees inwards, and the wrist also bends a few degrees. The back of the hand and forearm are rotated inwards a few degrees. The movement itself is a combination of a bend of the wrist and an inward rotation of the wrist. Let the impulse come from the large muscles around the upper arm and shoulder, in order to minimise tension in the arm. The elbow should be relaxed. The angle in the elbow should be 90 degrees or greater in order to achieve the most relaxed feeling possible, and to avoid the feeling of needing to physically hold up the forearm and hand.
Try video sitting stability to achieve a stable torso when seated, and to be able to balance on both ischia (the curved bones at the base of the pelvis).
Regarding instruments such as the marimba, xylophone and vibraphone, it is the feet that form the foundation. Please see video standing stability for standing position.
The basic position of rest and starting point for movements in the wrists requires a neutral position, i.e. the wrist/hand is not bent in an angle towards the side.
Drums
When holding the drumsticks, there should be a relaxed grip between the thumb and index finger, with the other fingers supporting, forming a channel to produce a flexible grip. The drumstick maintains contact with the pad of the thumb and with the inner side of the outer joint of the index finger.
3.13 Percussion Ergonomics
3.14 Organ Ergonomics
Organ Ergonomics
An organist requires stability in the upper body, as he or she does not have support from the feet for more short moments while playing. It is thus important to sit with support under a significant area of the thighs. Train by finding stability in the sitting position according to video sitting stability. Both your abdominal muscles and back extensors need to have strength and stamina in order to stabilise the pelvis and trunk of the body while sitting without constant support from the feet.
The contact point between the foot and the pedal should be the inner part of the front of the foot; for this reason, the knees should be held together, and thus a slight inward rotation of the hips is required. When playing certain organs, you may have to hold the thighbones more parallel in order to play with the front of both feet.
When playing on the pedals, most of your movements are directed down into the feet and lower legs. When playing pedals on the left side, your centre of balance will come more to the right buttock, and vice versa; it is important to be able to sit in the same place but change your centre of balance when playing the pedals.
The hand
Please see 3.5 Piano ergonomic and the different videos about hand exercises.

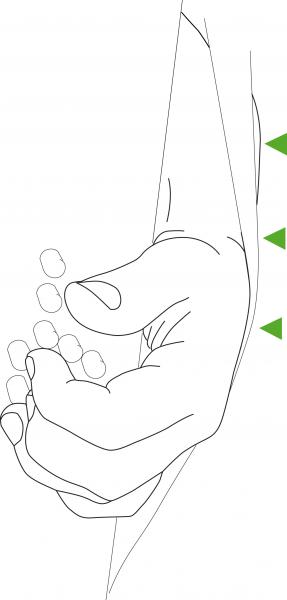
To stand and play is more of a strain for the shoulders and back, but otherwise the same as above. For a stable standing position, see video standing stability.
Illustration 3.15.3. The pressure lies between the straps and the wrists when the bellows are drawn out.
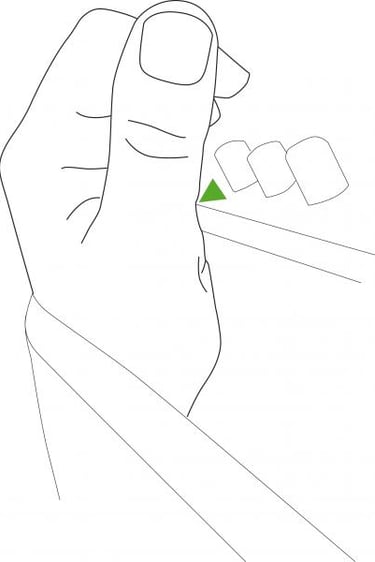

Illustration 3.15.2. It is very important for the left hand that the thumb is supported while playing.
The bellows are pulled out with the left wrist against the bass strap. When performing a bellow shake, the impulse comes from the upper arm.
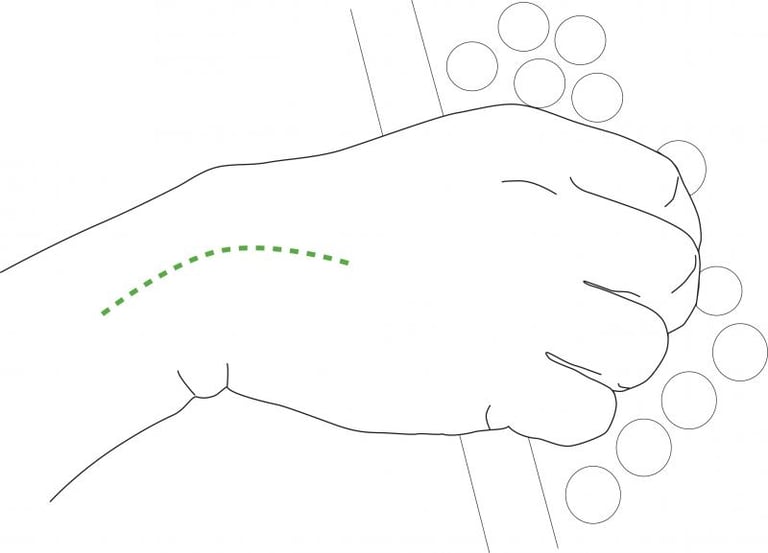
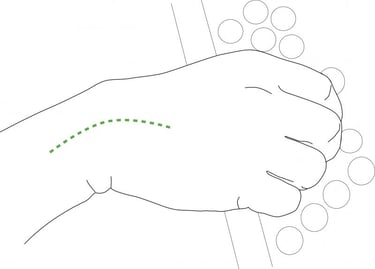
Illustration 3.15.1. All knuckles are visible and the wrist has a tendency to bend inwards.
Try to lay the hands over something round like your knees in order to achieve a good grip with the hands as a starting point for playing. The wrist itself leads the impulse.
The base joint of the thumb of the left hand will come in contact with the edge of the instrument for stability when playing the buttons.
3.15 Accordion Ergonomics
Begin with the sitting position by watching video sitting stability. Try to sit with good balance on both ischia (the curved bones at the base of the pelvis), good contact with your feet on the floor, and relaxed shoulders, feeling them resting easily. Slip the shoulder straps over your shoulders so that the instrument comes in close contact with your body. Let the shoulders continue to rest easily and let the forearms relax, so that the elbows also have a feeling of hanging freely. Place the instrument so that its centre of mass is in harmony with the body’s centre of mass, as the whole instrument will rest slightly more on the left side of the body. The right wrist will tend to bend inwards, in order to easily move the hand over the keys.
Sitting position without the instrument
Begin by using a chair with a flat seat. In order to balance the instrument, you need a sitting position with the thighs at a 90-degree angle in the hips, so that the instrument will not slide away. You can also lay a coarse or leathery cloth over the thighs in order to counteract the sliding of the instrument. The shoulders should be positioned symmetrically and in a relaxed manner with stable shoulder straps so that neither shoulder is pulled forwards. Go to video sitting stability for sitting position.
Sitting position with the instrument
Now take the instrument, and when you lift it from the floor, try to lift it with the help of your thigh and stomach muscles in order to minimise the strain on the shoulders. Notice the instrument’s centre of mass and try to balance it without working more than is absolutely necessary with the arms. When playing with the valves, you can use the tops of the fingers when there are fast passages in the music. Otherwise, the wrist will be in a better position if the valves are at the same level as the outer joints of the fingers.